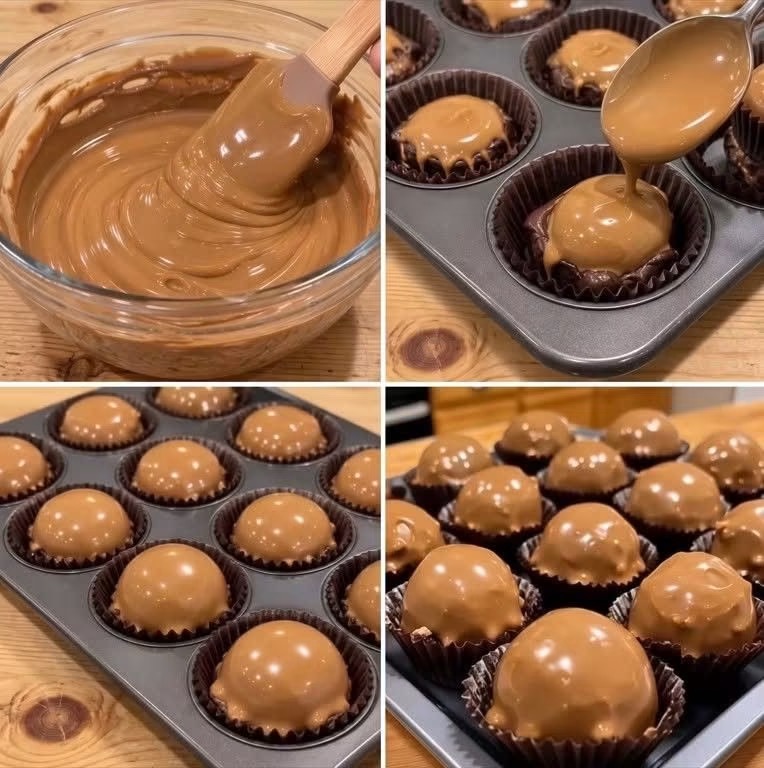
These Mini Chocolate Peanut Butter Cups are a delicious combination of rich chocolate and smooth, creamy peanut butter. Each little bite has a chocolate base and a sweet, velvety peanut butter topping that melts in your mouth.
Made with simple ingredients and no oven required, these homemade chocolate peanut butter candies are perfect for parties, holiday celebrations, afternoon snacks, or whenever you’re craving a sweet treat. They’re easy to prepare ahead of time and look beautiful arranged in mini paper liners.
🍫 Recipe Overview
| Category | Details |
| Preparation Time | 20 minutes |
| Chilling Time | 1–2 hours |
| Total Time | About 1 hour 20 minutes |
| Servings | 24 mini cups |
| Difficulty | Easy |
| Cooking Method | No-bake |
| Equipment | Mini muffin pan |
❤️ Why You’ll Love This Recipe
- No baking required: Simply melt, mix, assemble, and chill.
- Rich chocolate flavor: A smooth chocolate base balances the sweet filling.
- Creamy peanut butter topping: Soft, sweet, and wonderfully smooth.
- Perfect bite-sized treats: Great for sharing at parties and gatherings.
- Make-ahead friendly: Prepare them in advance and keep them refrigerated.
- Customizable: Add caramel, chopped nuts, or a little sea salt.
🥜 Ingredients
Chocolate Base
| Ingredient | Amount |
| Semi-sweet chocolate chips | 2 cups |
| Coconut oil or vegetable shortening | 1 tablespoon |
| Mini paper candy liners | 24 |
Creamy Peanut Butter Filling
| Ingredient | Amount |
| Creamy peanut butter | 1 cup |
| Unsalted butter, softened | ¼ cup |
| Powdered sugar | ¾ cup |
| Vanilla extract | 1 teaspoon |
| Salt | A small pinch |
| Milk or heavy cream | 1–2 tablespoons, if needed |
Optional Toppings
- Melted chocolate for drizzling.
- Chopped roasted peanuts.
- Flaky sea salt.
- Mini chocolate chips.
👩🍳 Step-by-Step Instructions
1. Prepare the Mini Muffin Pan
Line a 24-cup mini muffin pan with mini paper candy liners.
Make sure the liners are sitting evenly in the cavities so the chocolate cups hold their shape.
2. Melt the Chocolate
Place the semi-sweet chocolate chips and coconut oil in a microwave-safe bowl.
Microwave in 20-second intervals, stirring between each interval, until completely melted and smooth.
Alternatively, melt the chocolate using a heatproof bowl over a saucepan of gently simmering water.
3. Make the Chocolate Bases
Spoon approximately 1 teaspoon of melted chocolate into each paper liner.
Use the back of a small spoon to spread the chocolate slightly across the bottom.
Place the pan in the refrigerator for 10–15 minutes, or until the chocolate becomes firm.
4. Prepare the Peanut Butter Mixture
In a medium mixing bowl, combine the creamy peanut butter and softened butter.
Beat until smooth.
Add the powdered sugar, vanilla extract, and salt. Mix until creamy and well incorporated.
If the mixture is too thick to spoon easily, add milk or heavy cream, 1 teaspoon at a time, until it reaches a smooth, spoonable consistency.
5. Add the Peanut Butter Topping
Remove the chilled chocolate bases from the refrigerator.
Spoon approximately 1 tablespoon of the peanut butter mixture into each chocolate cup.
Gently spread or smooth the mixture with the back of a spoon.
For a rounded finish similar to the photograph, spoon the mixture into the center and allow it to settle naturally.
6. Finish the Cups
If desired, drizzle a little additional melted chocolate over the peanut butter topping.
You can also sprinkle chopped peanuts or flaky sea salt over the tops.
7. Chill Until Firm
Place the muffin pan in the refrigerator for 1–2 hours, or until the chocolate and peanut butter layers are completely firm.
Once set, carefully remove the cups from the pan and arrange them on a serving plate.
⭐ Best Tips for Perfect Chocolate Peanut Butter Cups
- Use good-quality chocolate chips for a smooth chocolate base.
- Melt chocolate slowly to prevent it from overheating or becoming grainy.
- Choose creamy peanut butter for the smoothest filling.
- Add powdered sugar gradually to control the sweetness and consistency.
- Avoid adding too much liquid to the peanut butter mixture.
- Chill the chocolate bases before adding the filling.
- Use a small cookie scoop to make evenly sized portions.
- Allow the cups to chill completely before removing the paper liners.
🥜 Best Ingredient Options
Chocolate: Semi-sweet chocolate creates a balanced flavor. Dark chocolate works well if you prefer a less sweet dessert.
Peanut Butter: Regular creamy peanut butter is best for a smooth, consistent filling. Natural peanut butter may separate and produce a softer texture.
Butter: Unsalted butter adds richness and helps create a creamy filling.
Powdered Sugar: This sweetens the peanut butter and gives it a thicker, candy-like consistency.
Coconut Oil: A small amount helps the chocolate melt smoothly and creates a firm chocolate shell after chilling.
🍬 Recipe Variations
- Dark Chocolate Peanut Butter Cups: Replace semi-sweet chocolate with dark chocolate.
- Salted Peanut Butter Cups: Sprinkle flaky sea salt over each cup before chilling.
- Caramel Peanut Butter Cups: Add a small spoonful of thick caramel sauce between the chocolate and peanut butter layers.
- Crunchy Peanut Butter Cups: Use crunchy peanut butter or fold chopped roasted peanuts into the filling.
- White Chocolate Peanut Butter Cups: Use melted white chocolate for the base.
- Chocolate Hazelnut Cups: Replace part of the peanut butter with chocolate hazelnut spread.
☕ What to Serve With Mini Peanut Butter Cups
These little chocolate treats pair beautifully with:
- Hot coffee or espresso.
- Cold milk.
- Hot chocolate.
- Vanilla ice cream.
- Fresh strawberries.
- Chocolate milkshakes.
- A platter of homemade cookies and brownies.
⏰ Make-Ahead Instructions
These homemade peanut butter cups are ideal for preparing ahead.
You can make the entire recipe up to 3 days before serving. Once the cups are completely firm, transfer them to an airtight container and refrigerate.
For parties and holiday celebrations, arrange them in mini candy liners just before serving.
🧊 Storage
- Refrigerator: Store in an airtight container for up to 2 weeks.
- Room Temperature: They can soften in warm conditions, so refrigeration is recommended.
- Avoid Moisture: Keep the container tightly covered to prevent condensation from affecting the chocolate.
❄️ Freezing Instructions
These chocolate peanut butter cups freeze well.
- Allow the cups to set completely.
- Arrange them in a single layer in a freezer-safe container.
- Separate additional layers with parchment paper.
- Cover tightly and freeze for up to 2 months.
- Thaw in the refrigerator before serving.
⚠️ Common Mistakes to Avoid
- Overheating the chocolate: This can make it thick and difficult to spread.
- Using runny peanut butter: Excess oil can make the filling too soft.
- Skipping the first chilling step: The chocolate base may mix with the filling.
- Adding too much milk: This can prevent the peanut butter layer from setting properly.
- Removing the cups too early: Allow enough chilling time for clean, firm cups.
- Using oversized portions: Too much filling can make the cups difficult to handle.
📊 Nutrition Estimate
Approximate values per mini cup, based on 24 servings:
| Nutrient | Amount |
| Calories | 175 kcal |
| Carbohydrates | 15 g |
| Protein | 4 g |
| Total Fat | 12 g |
| Saturated Fat | 5 g |
| Sugar | 11 g |
| Fiber | 2 g |
| Sodium | 65 mg |
Nutrition values are estimates and depend on the chocolate and peanut butter brands used.
❓ Frequently Asked Questions
1. Do I need to bake these peanut butter cups?
No. This is a no-bake dessert. The chocolate and peanut butter layers become firm in the refrigerator.
2. Can I use crunchy peanut butter?
Yes! Crunchy peanut butter adds a pleasant texture and little crunchy peanut pieces throughout the filling.
3. Why is my peanut butter filling too soft?
It may contain too much liquid or not enough powdered sugar. Add a little more powdered sugar and refrigerate until firm.
4. Can I use milk chocolate instead of semi-sweet chocolate?
Absolutely. Milk chocolate creates a sweeter, creamier flavor.
5. How long do these cups take to set?
They generally need 1–2 hours in the refrigerator, depending on their size and the thickness of the chocolate.
6. Can I make larger peanut butter cups?
Yes. Use a standard muffin pan with larger paper liners and increase the amount of chocolate and filling in each cup.
7. Can I make these without coconut oil?
Yes. You can melt the chocolate without coconut oil, although the small amount helps make it smoother and easier to spread.
❤️ Final Thoughts
These Mini Chocolate Peanut Butter Cups are an easy homemade candy that combines two irresistible flavors in one delicious bite. With their smooth chocolate base and creamy peanut butter topping, they’re a wonderful treat for holidays, parties, dessert tables, and everyday cravings.
Make a batch ahead of time, keep them chilled, and enjoy a sweet little chocolate treat whenever you like!