Introduction
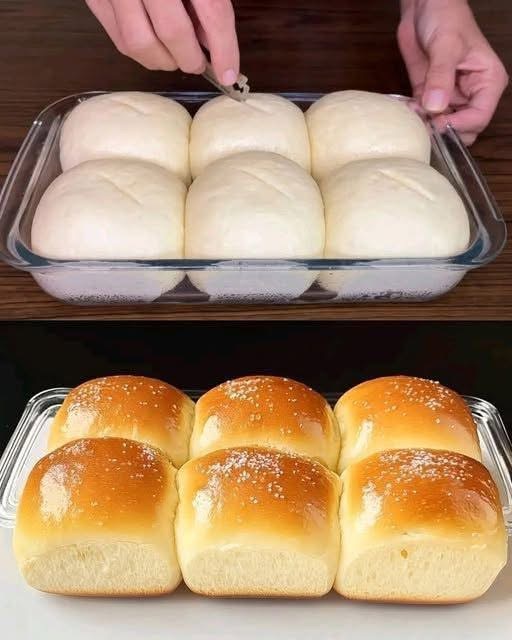
These Classic Butter Dinner Rolls are soft, fluffy, and wonderfully buttery, with a tender interior and a beautiful golden-brown top. Made with simple pantry ingredients, including all-purpose flour, warm milk, eggs, butter, and yeast, these homemade rolls have a light, pillowy texture that makes them perfect for almost any meal. Brushing the warm rolls with melted butter after baking gives them a delicious shine and an irresistible buttery aroma.
Whether you’re preparing a cozy family dinner, a holiday feast, or a special Sunday meal, these easy homemade dinner rolls are a wonderful addition to the table. They are delicious served warm with butter, honey, or jam, and they pair beautifully with soups, roasted meats, pasta, and hearty casseroles. Once you try making fresh bread rolls from scratch, you’ll appreciate how simple ingredients can create such a comforting and satisfying homemade bread recipe.
📋 Recipe Overview
| Recipe Detail | Information |
| Prep Time | 25 minutes |
| First Rise | 1–1½ hours |
| Second Rise | 30–45 minutes |
| Bake Time | 18–25 minutes |
| Total Time | Approximately 2½–3 hours |
| Servings | 6 large rolls |
| Course | Bread, Side Dish |
| Cuisine | American |
| Difficulty | Easy to Intermediate |
| Baking Temperature | 350°F (175°C) |
| Texture | Soft, fluffy, and tender |
| Flavor | Rich, buttery, and slightly sweet |
❤️ Why You’ll Love This Recipe
- Soft and fluffy texture: The combination of milk, eggs, and butter creates tender rolls with a delicate crumb.
- Simple ingredients: You can make these rolls with everyday baking staples.
- Rich buttery flavor: Melted butter in the dough and a final butter glaze make every bite delicious.
- Perfect for special occasions: Serve them for Thanksgiving, Christmas, Easter, or family gatherings.
- Versatile side dish: These rolls complement everything from roasted chicken to creamy pasta and vegetable soup.
- Freezer-friendly: Bake a batch ahead of time and freeze the rolls for convenient future meals.
- Customizable size: Make six large rolls or divide the dough into 10–12 smaller dinner rolls.
🛒 Ingredients
For the Dinner Roll Dough
| Ingredient | Quantity | Purpose |
| All-purpose flour | 3½ cups (approximately 420 g) | Provides structure |
| Granulated sugar | ¼ cup (50 g) | Adds mild sweetness and helps feed the yeast |
| Active dry yeast | 2¼ teaspoons (7 g or 1 packet) | Helps the dough rise |
| Salt | 1 teaspoon (6 g) | Enhances flavor |
| Warm milk | ¾ cup (180 ml) | Adds moisture and tenderness |
| Unsalted butter, melted | ¼ cup (57 g) | Gives the rolls a rich flavor |
| Large eggs, room temperature | 2 | Add richness, structure, and softness |
| Extra flour | As needed | For kneading and shaping |
For the Butter Finish
| Ingredient | Quantity |
| Unsalted butter, melted | 1–2 tablespoons |
| Flaky salt or dried herbs | Optional |
Important ingredient notes:
- Use milk warmed to approximately 105–110°F (40–43°C) to activate the yeast without damaging it.
- Let the melted butter cool slightly before adding it to the dough.
- Measure the flour carefully. Adding too much flour can make the rolls dense rather than fluffy.
- Bring the eggs to room temperature so they incorporate more easily into the dough.
👩🍳 Step-by-Step Instructions
Step 1: Activate the Yeast
- Pour the warm milk into a small bowl.
- Add a pinch of the measured sugar and the active dry yeast.
- Stir gently to combine.
- Let the mixture stand for 5–10 minutes, until foamy on the surface.
If the mixture does not become frothy, the yeast may be inactive or the milk may have been too hot or too cold. Check the yeast before continuing.
Step 2: Combine the Dry Ingredients
- In a large mixing bowl, whisk together the all-purpose flour, remaining sugar, and salt.
- Mix thoroughly so the salt and sugar are evenly distributed.
- Make a well in the center of the dry ingredients.
Step 3: Make the Dough
- Add the frothy yeast mixture to the flour.
- Pour in the melted butter.
- Add the room-temperature eggs.
- Mix with a wooden spoon or dough whisk until the ingredients come together into a rough dough.
The dough should feel soft and slightly tacky. If it is extremely sticky, add flour one tablespoon at a time rather than adding a large amount at once.
Step 4: Knead Until Smooth
- Transfer the dough to a lightly floured work surface.
- Knead by pushing the dough away with the heel of your hand, folding it back, and turning it.
- Continue kneading for 8–10 minutes, or until the dough becomes smooth and elastic.
- If using a stand mixer, knead with the dough hook on low to medium-low speed for approximately 6–8 minutes.
To check the dough, stretch a small piece gently between your fingers. It should stretch somewhat before tearing, although it may not form an extremely thin windowpane because of the butter and eggs.
Step 5: Let the Dough Rise
- Lightly grease a large bowl with butter or neutral oil.
- Place the dough in the bowl and turn it once to coat the surface lightly.
- Cover with plastic wrap or a clean kitchen towel.
- Leave it in a warm, draft-free place for 1–1½ hours, or until approximately doubled in size.
The rising time depends on the temperature of your kitchen. Judge the dough by its size rather than relying only on the clock.
Step 6: Divide and Shape the Rolls
- Gently press down the risen dough to release excess gas.
- Transfer it to a lightly floured work surface.
- Divide the dough into 6 equal portions for large rolls.
- For more uniform rolls, weigh the dough and divide the total weight by six.
- Shape each portion into a smooth ball by pulling the edges underneath and pinching them together.
- Place the balls seam-side down in a greased baking dish, leaving a little space between them.
For smaller dinner rolls, divide the dough into 10–12 portions and use a suitable baking dish or lined baking sheet.
Step 7: Allow the Second Rise
- Cover the shaped rolls loosely with a clean towel or lightly greased plastic wrap.
- Let them rise for 30–45 minutes.
- Watch for the rolls to become noticeably puffy and nearly double in size.
Avoid allowing them to rise too long. Overproofed rolls may collapse or develop a weak structure during baking.
Step 8: Preheat the Oven
About 15 minutes before the rolls finish rising, preheat the oven to 350°F (175°C).
Position a rack in the center of the oven to encourage even baking.
Step 9: Brush and Bake
- Gently brush the tops of the risen rolls with a little melted butter.
- Alternatively, brush with a beaten egg mixed with one teaspoon of water for a shinier, deeper golden finish.
- Place the baking dish in the preheated oven.
- Bake for 18–25 minutes, depending on the size of the rolls and your baking dish.
- Check that the tops are golden brown and the centers are fully baked.
Large rolls may require the full baking time, while smaller rolls may finish sooner. If the tops brown too quickly, loosely cover them with aluminum foil for the final few minutes.
For an extra check, the center of a fully baked enriched roll should generally reach approximately 190°F (88°C).
Step 10: Brush With Butter and Cool
- Remove the rolls from the oven.
- Immediately brush the tops with another thin layer of melted butter.
- Let the rolls rest in the baking dish for approximately 5–10 minutes.
- Serve warm, or transfer them to a wire rack if you want to prevent excess moisture from collecting underneath.
The final butter coating keeps the crust soft and adds a lovely shine.
⭐ Best Tips for Soft and Fluffy Dinner Rolls
1. Use the Correct Milk Temperature
Milk that is too hot can damage the yeast. Aim for 105–110°F (40–43°C) when activating active dry yeast.
2. Avoid Adding Too Much Flour
A slightly tacky dough usually produces softer rolls. Add extra flour gradually and only when needed.
3. Knead Thoroughly
Proper kneading develops gluten, helping the rolls rise and hold their shape.
4. Give the Dough Enough Time to Rise
The dough should approximately double during the first rise. A cool kitchen may require additional time.
5. Shape the Balls Evenly
Uniform rolls bake at a similar rate and look more attractive when served.
6. Don’t Rush the Second Rise
The shaped dough should become visibly puffy before it goes into the oven.
7. Brush With Butter Twice
Brush the rolls before baking for flavor and again immediately after baking for a soft, glossy finish.
8. Avoid Overbaking
Overbaking dries out the crumb. Remove the rolls once they are golden and cooked through.
9. Let Them Rest Briefly
A short resting period allows the interior to settle, making the rolls easier to pull apart.
🧈 Best Ingredient Options
Flour
All-purpose flour works well for soft, tender rolls. Bread flour can also be used, producing a slightly chewier texture because it contains more protein.
Milk
| Milk Option | Result |
| Whole milk | Rich flavor and a tender crumb |
| 2% milk | Slightly lighter but still soft |
| Lactose-free dairy milk | Similar results to regular dairy milk |
| Unsweetened plant-based milk | May work, although flavor and browning can vary |
For the richest flavor, whole milk is an excellent choice.
Butter
Unsalted butter lets you control the amount of salt in the recipe. Salted butter can be used, but consider slightly reducing the added salt.
Yeast
This recipe uses active dry yeast. Instant yeast can also work; it can generally be mixed directly into the flour, although following the yeast manufacturer’s instructions is best.
Sugar
Granulated sugar gives the rolls a subtle sweetness. You can reduce it slightly for a more savory roll, although the flavor and browning may change.
🔄 Recipe Variations
1. Garlic Butter Dinner Rolls
Mix one minced garlic clove into 2 tablespoons of melted butter. Brush the baked rolls with the garlic butter and sprinkle with chopped parsley.
2. Honey Butter Rolls
Replace half the granulated sugar with honey. After baking, brush the rolls with a mixture of melted butter and a little honey.
3. Herb Butter Rolls
Add 1 teaspoon of dried Italian herbs to the flour mixture. Brush the baked rolls with butter mixed with chopped parsley, rosemary, or thyme.
4. Cheesy Dinner Rolls
Flatten each dough portion slightly, place a small cube of mozzarella or cheddar in the center, and seal completely before shaping. Bake until golden and cooked through.
5. Honey Wheat Dinner Rolls
Replace up to 1 cup of the all-purpose flour with whole-wheat flour and add 1 tablespoon of honey. The rolls will have a nuttier flavor and a slightly denser crumb.
6. Pull-Apart Butter Rolls
Arrange the shaped dough balls close together in a round or rectangular baking dish. Once baked, the rolls will pull apart easily.
7. Mini Dinner Rolls
Divide the dough into 10–12 portions instead of six. Begin checking for doneness after approximately 12–15 minutes, as smaller rolls bake more quickly.
8. Sweet Breakfast Rolls
Add ½ teaspoon of ground cinnamon and a little extra vanilla extract to the dough. Serve the finished rolls with butter, honey, or fruit preserves.
🍽️ What to Serve With Classic Butter Dinner Rolls
These homemade rolls are versatile enough to serve with everyday dinners or special holiday meals.
| Dish | Why It Pairs Well |
| Roast chicken | Complements the savory juices and crisp skin |
| Beef pot roast | Perfect for soaking up rich gravy |
| Creamy garlic chicken pasta | Balances the creamy sauce |
| French onion soup | Makes a comforting bread-and-soup combination |
| Mashed potatoes and gravy | Adds a soft, buttery bread option |
| Vegetable soup | Turns a simple soup into a satisfying meal |
| Baked ham | Works beautifully for holiday dinners |
| Roasted vegetables | Complements their caramelized flavor |
| Turkey and stuffing | A classic holiday pairing |
| Butter, honey, or jam | Perfect for breakfast or a snack |
For a special dinner, serve the rolls in a lined bread basket while they are still slightly warm.
⏰ Make-Ahead Instructions
Option 1: Prepare the Dough the Night Before
- Prepare the dough and knead it until smooth.
- Place it in a lightly greased bowl and cover tightly.
- Refrigerate overnight, ideally after allowing it to begin rising briefly at room temperature.
- The next day, let the dough sit at room temperature until it is workable.
- Shape the rolls and allow them to rise until puffy.
- Bake as directed.
Cold dough may need additional time to rise, so look for the correct texture and size rather than following the usual timing exactly.
Option 2: Shape the Rolls Ahead
- Prepare and shape the rolls.
- Place them in the greased baking dish.
- Cover tightly and refrigerate before the final rise.
- When ready to bake, let them warm and rise until puffy.
- Brush with butter and bake.
The exact timing will depend on how much the dough rises in the refrigerator.
Option 3: Bake in Advance
Bake the rolls completely and allow them to cool. Store them in an airtight container, then warm them shortly before serving.
🧊 Storage Instructions
Room Temperature
Allow the rolls to cool completely before storing. Place them in an airtight container or resealable bag and keep them at room temperature for up to 2–3 days.
Avoid refrigerating bread rolls unless necessary, as refrigeration can make bread stale more quickly.
Refrigerator
If your kitchen is very warm or you need to refrigerate the rolls for another reason, store them in a sealed container and use within approximately 4–5 days. Their texture may become firmer.
Keep Them Soft
Store the rolls only after they have cooled enough to prevent condensation from forming inside the container. Close the container tightly to limit moisture loss.
🔥 Reheating Instructions
Oven Method
- Preheat the oven to 300°F (150°C).
- Place the rolls in an oven-safe dish.
- Cover loosely with foil to help retain moisture.
- Warm for approximately 8–12 minutes, depending on their size.
- Brush with a little melted butter before serving.
Microwave Method
- Place one roll on a microwave-safe plate.
- Cover it with a slightly damp paper towel.
- Microwave for 10–15 seconds.
- Check the texture and heat in additional 5-second intervals if necessary.
Microwave heating works well for individual rolls, but avoid overheating them because they can become tough once they cool.
Air Fryer Method
- Preheat the air fryer to 300°F (150°C).
- Place the rolls in the basket.
- Heat for approximately 2–4 minutes, checking frequently.
For the softest result, wrap the rolls loosely in foil if your air fryer allows it.
❄️ Freezing Instructions
These butter dinner rolls freeze well, making them convenient for meal preparation and holiday entertaining.
Freezing Baked Rolls
- Bake the rolls and let them cool completely.
- Place them in a freezer-safe bag or airtight container.
- Remove excess air and seal tightly.
- Label with the date.
- Freeze for up to 2–3 months for best quality.
Thawing and Reheating
- Remove the desired number of rolls from the freezer.
- Let them thaw at room temperature while covered.
- Warm them in a 300°F (150°C) oven for 8–12 minutes.
- Brush with melted butter before serving.
Freezing Unbaked Dough
You can also freeze shaped dough portions, although the yeast may become less active after freezing.
- Shape the rolls and place them on a lined tray.
- Freeze until firm.
- Transfer them to a freezer-safe container.
- When ready to use, thaw in the refrigerator.
- Allow the dough to rise until puffy before baking.
Because yeast activity can vary after freezing, the rolls may require extra rising time.
⚠️ Common Mistakes to Avoid
1. Using Milk That Is Too Hot
Very hot milk can damage the yeast and prevent the dough from rising properly. Check the temperature before adding the yeast.
2. Using Expired or Inactive Yeast
If the yeast mixture does not foam after 5–10 minutes, check the yeast’s freshness and the milk temperature.
3. Adding Too Much Flour
Excess flour creates a stiff dough and dense rolls. Add flour gradually and keep the dough soft.
4. Underkneading the Dough
Insufficient kneading can produce rolls with a weak structure and a less even crumb.
5. Overkneading in a Stand Mixer
Mixing too aggressively or for too long can overheat the dough. Use low to medium-low speed and check the dough’s texture.
6. Skipping the First Rise
The dough needs time to develop flavor and structure. Let it rise until approximately doubled in size.
7. Overproofing the Shaped Rolls
Rolls that rise too much may collapse in the oven. Bake when they are puffy and ready, rather than waiting indefinitely.
8. Baking at the Wrong Temperature
An oven that is too hot may brown the outside before the centers finish baking. Use an oven thermometer if your oven temperature is unreliable.
9. Forgetting the Butter Finish
Brushing the baked rolls with melted butter adds flavor and helps keep the crust soft.
10. Storing Them While Hot
Trapped steam can create condensation and a damp surface. Let the rolls cool before placing them in an airtight container.
📊 Nutrition Estimate
The following estimates are for one large roll, assuming the recipe makes six rolls and includes the dough ingredients but not an additional generous butter topping.
| Nutrient | Approximate Amount Per Roll |
| Calories | 350–390 kcal |
| Protein | 9–11 g |
| Total Fat | 11–13 g |
| Saturated Fat | 6–7 g |
| Carbohydrates | 50–56 g |
| Sugar | 8–10 g |
| Fiber | 1–2 g |
| Sodium | 350–450 mg |
These figures are estimates. Actual nutrition will vary depending on the flour brand, milk, egg size, butter quantity, and the final number of rolls. Making 10–12 smaller rolls will reduce the calories and other nutrients per roll.
❓ Frequently Asked Questions
Why Are My Dinner Rolls Not Fluffy?
The most common causes are inactive yeast, insufficient kneading, too much flour, or inadequate rising time. Check the yeast, keep the dough soft, knead until elastic, and let the dough rise until visibly expanded.
Can I Make These Rolls Without Eggs?
Yes, but the texture will be different. Eggs contribute richness, color, and tenderness. An egg-free version may require slight adjustments to the liquid and flour amounts.
Can I Use Instant Yeast Instead of Active Dry Yeast?
Yes. Instant yeast can generally be mixed directly into the dry ingredients. Follow the package directions and watch the dough’s rise rather than relying solely on the listed time.
Can I Use Bread Flour?
Yes. Bread flour can produce slightly chewier rolls with a stronger structure. You may need to adjust the liquid slightly depending on how much moisture the flour absorbs.
How Do I Know When the Dough Has Risen Enough?
During the first rise, the dough should approximately double in size. After shaping, the rolls should become noticeably puffy and nearly double in size. The timing depends on your kitchen temperature.
Why Did My Rolls Turn Out Dense?
Dense rolls can result from adding too much flour, not kneading enough, using inactive yeast, or baking before the dough has risen sufficiently. Measuring the flour accurately and allowing adequate proofing time are particularly important.
Can I Make Smaller Dinner Rolls?
Absolutely. Divide the dough into 10–12 equal portions instead of six. Smaller rolls usually bake more quickly, so begin checking them after approximately 12–15 minutes.
Can I Brush the Rolls With Egg Wash?
Yes. Whisk one egg with a teaspoon of water and brush a thin layer over the tops before baking. This produces a shiny, deeper golden crust. For a softer, more buttery finish, use melted butter instead.
Can I Make These Rolls Without a Stand Mixer?
Yes. A large bowl, wooden spoon, and clean work surface are all you need. Knead by hand for approximately 8–10 minutes, or until the dough becomes smooth and elastic.
Can I Make the Dough Ahead of Time?
Yes. Refrigerating the dough overnight can make meal preparation easier. Keep it covered and allow enough time for it to warm, shape, and rise before baking.
How Do I Keep Dinner Rolls Soft the Next Day?
Store completely cooled rolls in an airtight container at room temperature. Reheat them briefly, covered with foil in the oven or with a damp paper towel in the microwave.
Can I Freeze Homemade Butter Dinner Rolls?
Yes. Cool the baked rolls completely, package them airtight, and freeze for up to 2–3 months for best quality. Thaw and warm them before serving.
🍞 Final Thoughts
These Classic Butter Dinner Rolls are soft, golden, and full of comforting homemade flavor. Their tender texture, subtle sweetness, and buttery finish make them a reliable addition to everything from weeknight dinners to festive holiday meals. Although the dough needs time to rise, the preparation itself is straightforward, and the results are well worth the wait.
For the best rolls, keep the dough soft, knead it thoroughly, allow both rises to finish properly, and brush the tops with melted butter as soon as they come out of the oven. Serve them warm alongside your favorite main dishes, or enjoy a freshly baked roll with butter and honey. Once you master this simple recipe, you may find yourself making a batch whenever you want fresh, comforting homemade bread.