Introduction
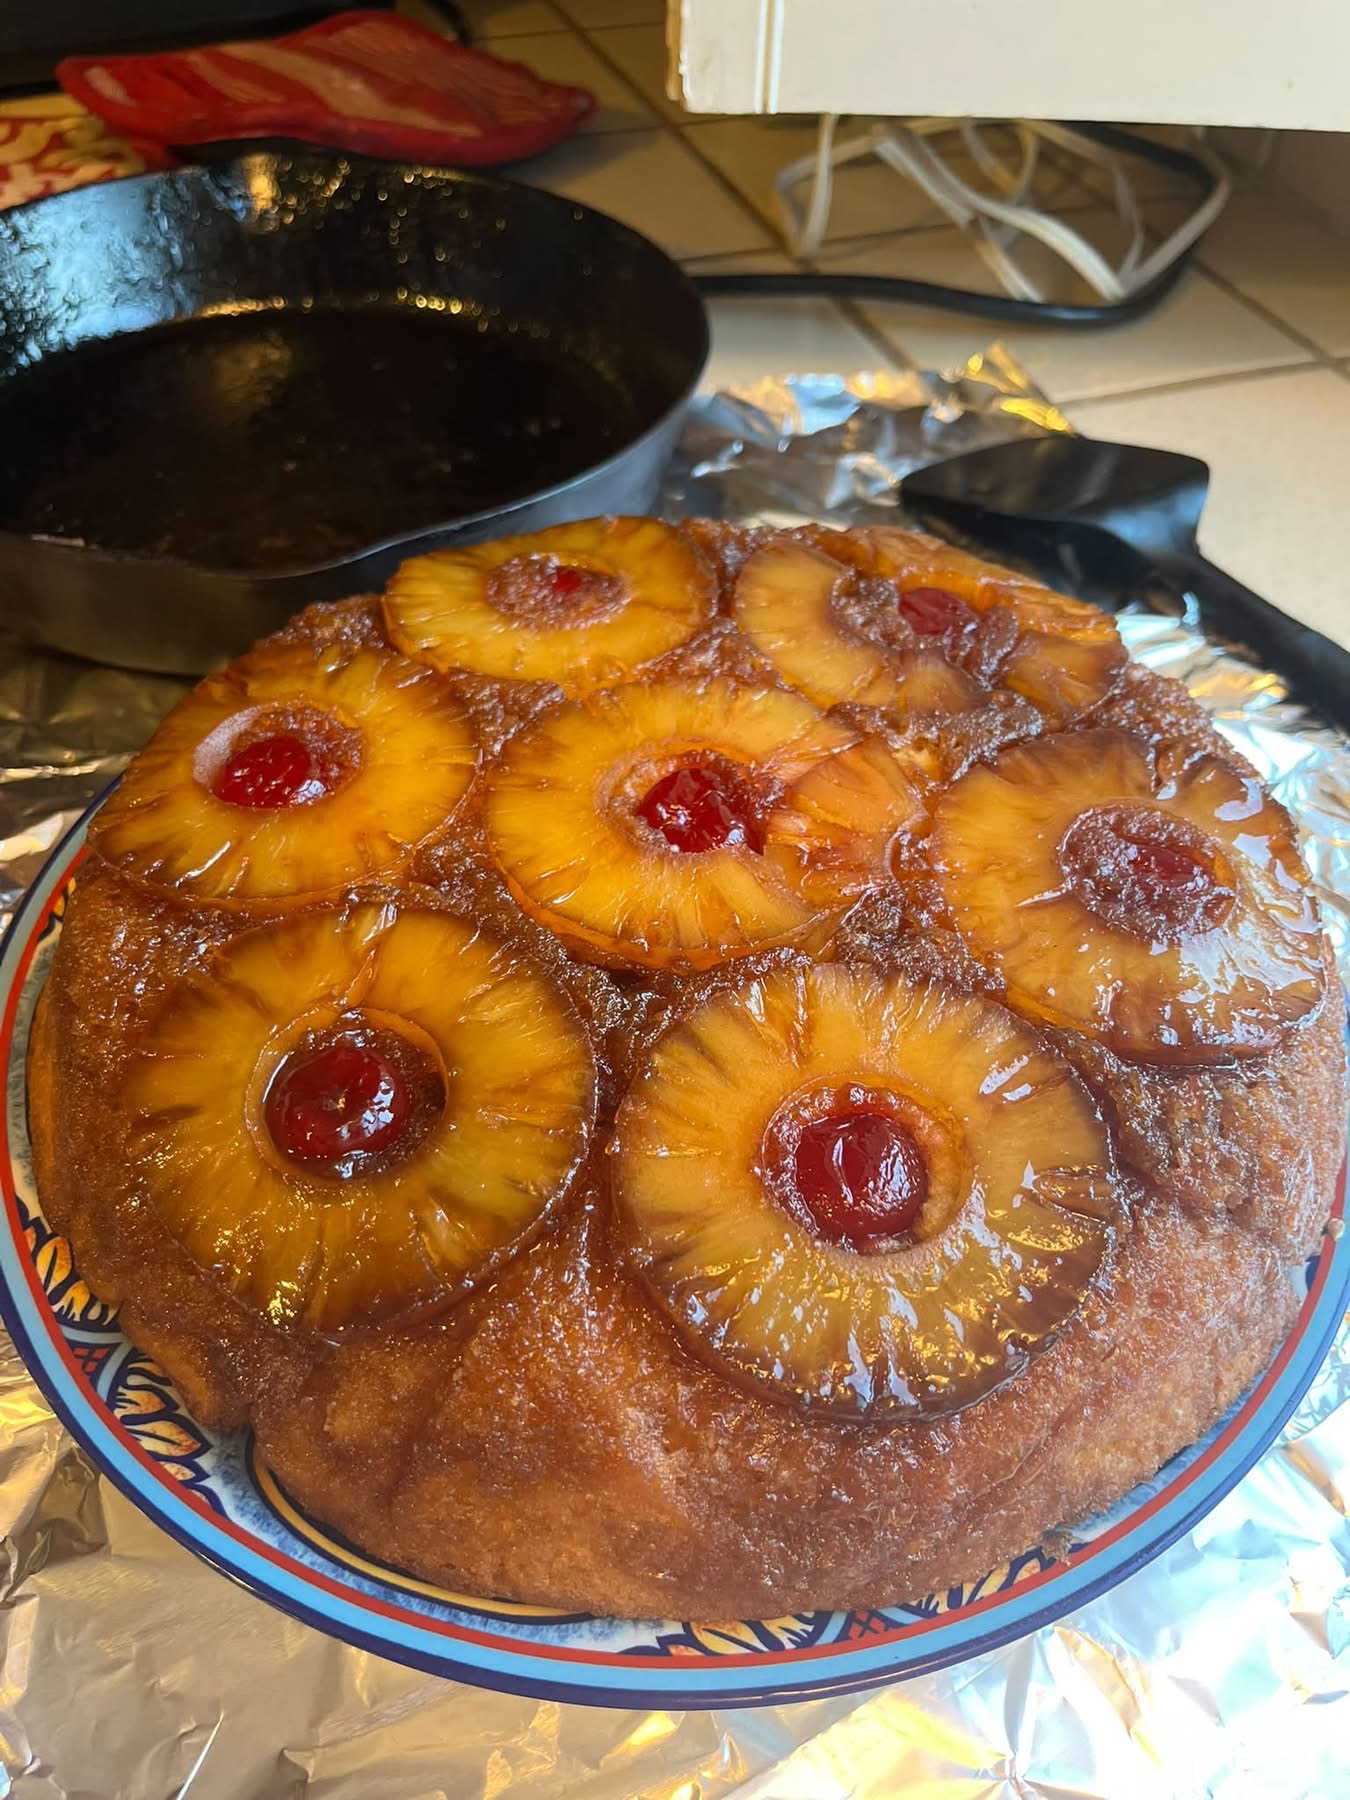
This old-fashioned pineapple upside-down cake is a beautiful homemade dessert featuring juicy pineapple rings, sweet maraschino cherries, and a rich brown sugar glaze. With its golden, buttery cake and glossy caramelized fruit topping, this classic pineapple dessert is perfect for family gatherings, holidays, potlucks, and weekend baking. Every slice delivers a delicious combination of soft cake, tropical fruit, and buttery caramel flavor.
Recipe Overview
| Recipe Details | Information |
| Recipe Name | Pineapple Upside-Down Cake |
| Preparation Time | 20 minutes |
| Baking Time | 40–50 minutes |
| Cooling Time | 10–15 minutes |
| Total Time | Approximately 1 hour 20 minutes |
| Servings | 8–10 slices |
| Cuisine | American |
| Course | Dessert |
| Difficulty | Easy to moderate |
| Baking Temperature | 350°F (175°C) |
| Main Ingredients | Pineapple, butter, brown sugar, flour, eggs |
| Texture | Moist, tender, and buttery |
| Flavor | Sweet, fruity, and caramelized |
| Best Occasion | Family dinners, holidays, birthdays, and potlucks |
Why You’ll Love This Recipe
1. Beautiful caramelized topping: Pineapple rings and bright red cherries create an attractive finish that makes this cake look special without complicated decorating.
2. Soft and moist cake: A buttery homemade cake balances the sweetness of the pineapple and brown sugar glaze.
3. Simple pantry ingredients: You can prepare this classic dessert using everyday baking ingredients and canned pineapple.
4. Perfect for special occasions: This vintage-inspired cake is ideal for celebrations, family gatherings, and homemade dessert tables.
5. Easy to customize: You can add coconut, pecans, cinnamon, or other fruit to create your own variation.
6. A reliable make-ahead dessert: Bake it earlier in the day and allow the flavors to settle before serving.
7. Great for home baking: Whether you are an experienced baker or a beginner, this recipe offers an approachable way to make a classic American dessert from scratch.
Ingredients
For the Pineapple and Brown Sugar Topping
| Ingredient | Quantity | Purpose |
| Unsalted butter | ¼ cup (57 g) | Creates a rich, buttery glaze |
| Light brown sugar | ¾ cup (150 g), packed | Forms the caramelized topping |
| Pineapple rings | 7–9 rings, drained | Create the signature fruit layer |
| Maraschino cherries | 7–9, drained and patted dry | Add color and sweetness |
| Pineapple juice | 2 tablespoons | Adds moisture and fruit flavor |
For the Homemade Cake Batter
| Ingredient | Quantity | Purpose |
| All-purpose flour | 1½ cups (190 g) | Provides the cake structure |
| Granulated sugar | ¾ cup (150 g) | Sweetens the cake |
| Unsalted butter | ½ cup (113 g), softened | Adds richness and tenderness |
| Large eggs | 2 | Bind the ingredients together |
| Whole milk | ½ cup (120 ml) | Moistens the batter |
| Baking powder | 1½ teaspoons | Helps the cake rise |
| Vanilla extract | 2 teaspoons | Enhances the flavor |
| Salt | ¼ teaspoon | Balances the sweetness |
Ingredient preparation: Drain the pineapple rings thoroughly and pat them dry with paper towels. Excess juice can make the topping watery and affect how cleanly the cake releases from the pan.
For the best texture, bring the eggs, milk, and butter to room temperature before preparing the batter.
Step-by-Step Instructions
Step 1: Preheat the Oven
Preheat your oven to 350°F (175°C).
Grease a 9-inch round cake pan generously with butter or nonstick baking spray. A solid cake pan is generally preferable to a springform pan because the caramel topping can leak through gaps.
Step 2: Prepare the Brown Sugar Glaze
Place ¼ cup of butter in the prepared cake pan and melt it gently. You can do this in the oven for a few minutes or melt the butter separately before pouring it into the pan.
Sprinkle the brown sugar evenly over the melted butter. Add 2 tablespoons of pineapple juice and spread the mixture into an even layer.
Step 3: Arrange the Pineapple and Cherries
Arrange the drained pineapple rings over the brown sugar mixture.
Place one maraschino cherry in the center of each ring. If you have extra pineapple pieces, you can arrange them in the gaps.
Take a moment to arrange the fruit carefully because this layer will become the decorative top of the finished cake.
Step 4: Mix the Dry Ingredients
In a medium bowl, whisk together the flour, baking powder, and salt.
Mixing these ingredients before adding them to the wet ingredients helps distribute the leavening evenly throughout the cake batter.
Step 5: Cream the Butter and Sugar
In a separate large bowl, beat the softened butter and granulated sugar for approximately 2–3 minutes, until the mixture looks lighter and fluffy.
Add the eggs one at a time, beating after each addition. Mix in the vanilla extract.
Step 6: Finish the Cake Batter
Add the flour mixture in three additions, alternating with the milk in two additions. Begin and end with the dry ingredients.
Mix on low speed or stir gently until the ingredients are just combined. Avoid overmixing, which can make the cake dense.
The batter should be thick but spreadable.
Step 7: Assemble the Cake
Carefully spoon the batter over the pineapple rings and cherries.
Spread it gently with a spatula, making sure the fruit remains in place. Smooth the top so the cake bakes evenly.
Step 8: Bake the Cake
Place the pan on the center rack of the preheated oven.
Bake for approximately 40–50 minutes, or until the top is golden and a toothpick inserted into the center of the cake comes out clean or with a few moist crumbs.
If the top begins to brown too quickly, loosely cover it with foil near the end of baking.
Step 9: Cool Briefly
Remove the cake from the oven and allow it to rest in the pan for 10–15 minutes.
Do not leave it in the pan for too long because the caramelized sugar may begin to harden and make the cake more difficult to release.
Step 10: Invert the Cake
Run a thin knife carefully around the inside edge of the pan.
Place a heat-safe serving plate over the cake pan. Using oven mitts, firmly hold the plate and pan together, then carefully invert them.
Leave the pan in place for approximately 30 seconds before lifting it slowly.
If any pineapple rings or cherries stick to the pan, gently reposition them on the cake while the topping is still warm.
Allow the cake to cool for at least 15–20 minutes before slicing for cleaner pieces.
Best Tips
Drain the pineapple thoroughly. Excess moisture can interfere with the brown sugar topping and make the cake soggy.
Measure the flour correctly. Weighing the flour is the most reliable method. If using measuring cups, spoon the flour into the cup and level it without packing it down.
Use room-temperature ingredients. Softened butter, eggs, and milk combine more evenly and help create a tender cake.
Do not overmix the batter. Stop mixing as soon as the flour disappears to avoid developing too much gluten.
Grease the pan well. Pay particular attention to the bottom and sides because the caramelized topping can stick.
Invert while the topping is still slightly warm. Waiting too long can allow the brown sugar glaze to harden.
Use a sturdy serving plate. The plate should be larger than the cake pan and strong enough to support the cake during inversion.
Check the cake before removing it. Baking times vary by oven and pan material. A toothpick test is more reliable than time alone.
Let the cake settle before slicing. A short cooling period allows the glaze to cling to the fruit and makes serving easier.
Best Ingredient Options
| Ingredient | Best Option | Possible Substitute |
| Pineapple | Canned pineapple rings in juice | Fresh pineapple, sliced evenly |
| Cherries | Maraschino cherries | Halved fresh cherries, pitted |
| Brown sugar | Light brown sugar | Dark brown sugar for deeper flavor |
| Butter | Unsalted butter | Salted butter, with reduced added salt |
| Flour | All-purpose flour | A suitable 1:1 gluten-free baking blend |
| Milk | Whole milk | 2% milk or an unsweetened dairy alternative |
| Vanilla | Pure vanilla extract | Vanilla bean paste |
| Sugar | Granulated white sugar | A suitable baking sugar substitute, following its conversion guidance |
Canned pineapple is especially convenient because the rings are uniform and easy to arrange. If using fresh pineapple, slice it evenly and make sure the pieces are not excessively wet.
Recipe Variations
1. Pineapple Upside-Down Cake with Pecans
Sprinkle ¼ cup of chopped pecans over the brown sugar glaze before arranging the pineapple. The nuts add a pleasant crunch and complement the buttery caramel flavor.
2. Coconut Pineapple Cake
Add ¼ cup of shredded coconut to the batter. You can also sprinkle a little toasted coconut over the cake after inverting it.
3. Cinnamon Pineapple Upside-Down Cake
Add ½ teaspoon of ground cinnamon to the brown sugar topping or cake batter. Cinnamon gives the dessert a warm flavor that works especially well during autumn and winter.
4. Pineapple Upside-Down Cupcakes
Divide the butter and brown sugar topping among a greased muffin pan. Add small pineapple pieces and cherry halves, then spoon the batter over the fruit.
Bake at 350°F (175°C) for approximately 18–25 minutes, checking for doneness with a toothpick.
5. Pineapple and Cherry Sheet Cake
Use a suitable rectangular cake pan and arrange pineapple rings or smaller pineapple pieces across the bottom. Adjust the baking time according to the pan dimensions and batter depth.
6. Gluten-Free Pineapple Upside-Down Cake
Replace the all-purpose flour with a reputable 1:1 gluten-free baking blend that contains a suitable binder. Follow the manufacturer’s guidance, as the texture and moisture absorption may differ.
7. Reduced-Sugar Version
Reduce the sugar in the topping slightly and use less granulated sugar in the cake batter. The result will be less sweet, although the cake’s texture and caramelization may change.
What to Serve With Pineapple Upside-Down Cake
| Serving Option | Why It Works |
| Vanilla ice cream | Complements the warm caramelized pineapple |
| Fresh whipped cream | Adds a light, creamy finish |
| Fresh berries | Provide a fresh, slightly tart contrast |
| Hot coffee | Balances the sweetness of the cake |
| Black tea | Offers a simple afternoon dessert pairing |
| Greek yogurt | Adds a tangy contrast when served alongside a slice |
| Caramel drizzle | Enhances the buttery brown sugar flavor |
| Toasted coconut | Adds texture and tropical flavor |
For a classic dessert presentation, serve a slightly warm slice with a small scoop of vanilla ice cream.
Make-Ahead Instructions
Pineapple upside-down cake can be prepared ahead of time for parties, holidays, and family gatherings.
Prepare the ingredients ahead: Drain the pineapple, dry the cherries, and measure the dry ingredients in advance. Store the prepared components separately until you are ready to bake.
Bake earlier in the day: Bake and invert the cake according to the recipe, then allow it to cool before covering it.
For the best presentation: Arrange the fruit carefully before baking and invert the cake while the topping is still warm.
For next-day serving: Bake the cake the day before and refrigerate it once cooled if you prefer to keep it for longer than two days or if your kitchen is warm.
Allow a refrigerated cake to sit at room temperature briefly before serving, if desired. Do not leave it out for extended periods.
Storage
| Storage Method | Recommended Time | Instructions |
| Room temperature | Up to 2 days | Keep covered in a cool environment |
| Refrigerator | 3–4 days | Store in an airtight container |
| Freezer | Best quality within 2–3 months | Wrap individual slices securely |
Because this cake contains moist fruit, refrigeration is a sensible option in warm conditions or when keeping it beyond a short period.
For room-temperature storage, keep the cake covered and in a cool location. If the kitchen is hot, refrigerate it promptly rather than leaving it out.
Discard the cake if you notice mold, an unusual smell, or other signs of spoilage.
Reheating
Microwave Method
Place one slice on a microwave-safe plate. Heat for approximately 10–15 seconds, then continue in short intervals if needed.
Heating times vary according to the slice size and microwave power.
Oven Method
Preheat the oven to 300°F (150°C). Place the cake slices in an oven-safe dish and cover loosely with foil.
Warm for approximately 8–12 minutes, checking that the cake does not dry out.
Serving at Room Temperature
If the cake has been refrigerated, you can let an individual slice sit out briefly before serving. This helps soften the butter in the cake and makes the texture more pleasant.
Avoid heating the cake for too long, as the pineapple topping can become excessively hot and the cake can dry out.
Freezing
Pineapple upside-down cake can be frozen in individual slices or as a whole cake.
- Allow the cake to cool completely.
- Slice the cake if you want convenient individual portions.
- Wrap each slice tightly in plastic wrap or another suitable freezer-safe wrapping.
- Place the wrapped slices in an airtight freezer container or freezer bag.
- Label with the date and freeze.
For the best flavor and texture, use the frozen cake within 2–3 months.
To thaw, place the wrapped slices in the refrigerator for several hours or overnight. Unwrap once thawed and serve at room temperature, or warm gently in the microwave.
The pineapple topping may release some moisture after thawing, so the texture may be slightly softer than freshly baked cake.
Common Mistakes to Avoid
1. Using wet pineapple
Excess pineapple juice can create a watery topping. Drain the rings well and pat them dry before arranging them in the pan.
2. Forgetting to grease the cake pan
The caramelized sugar can stick firmly to the pan. Grease it thoroughly and use a suitable solid cake pan.
3. Overmixing the batter
Too much mixing can produce a tough cake. Mix only until the ingredients are combined.
4. Baking at the wrong temperature
An oven that is too hot may brown the cake before the center is cooked. Preheat the oven fully and use an oven thermometer if temperature accuracy is uncertain.
5. Inverting the cake too late
If the cake cools completely in the pan, the sugar topping may harden and stick. Invert it after approximately 10–15 minutes of cooling.
6. Inverting the cake too early
The cake needs a brief resting period to set. Inverting it immediately can cause the cake to break or the fruit to shift.
7. Cutting the cake while it is too hot
The warm cake is more fragile, and the topping may slide. Let it cool briefly before slicing.
8. Using too much flour
Excess flour can make the cake dry and dense. Measure carefully, preferably by weight.
9. Expecting fresh pineapple to behave exactly like canned pineapple
Fresh pineapple varies in moisture and sweetness. Drain or pat it dry and cut it into even rings for more consistent results.
10. Storing the cake uncovered
Uncovered cake can dry out and absorb refrigerator odors. Keep it covered in an airtight container.
Nutrition Estimate
The following nutrition values are approximate estimates for one slice, assuming the cake is divided into 10 servings. Actual values depend on the ingredient brands, portion size, and amount of topping consumed.
| Nutrient | Approximate Amount per Slice |
| Calories | 330–400 kcal |
| Protein | 4–5 g |
| Total Fat | 12–16 g |
| Saturated Fat | 7–10 g |
| Carbohydrates | 52–60 g |
| Sugar | 35–45 g |
| Fiber | 1–2 g |
| Sodium | 180–280 mg |
These figures are estimates rather than laboratory-verified nutrition facts. For more accurate information, calculate the nutritional values using the exact ingredients and quantities you use.
Frequently Asked Questions
1. Why is my pineapple upside-down cake soggy?
Excess moisture from the pineapple is a common cause. Drain the rings thoroughly and pat them dry before arranging them over the brown sugar glaze.
2. Should I use fresh or canned pineapple?
Both can work well. Canned pineapple rings are convenient and consistent, while fresh pineapple offers a brighter fruit flavor. Whichever you choose, avoid adding excess liquid to the topping.
3. When should I flip a pineapple upside-down cake?
Allow the cake to rest in the pan for approximately 10–15 minutes after baking. Then run a knife around the edge and carefully invert it onto a serving plate.
4. How do I know when the cake is done?
The cake should be golden and set in the center. A toothpick inserted into the cake should come out clean or with a few moist crumbs.
5. Can I make pineapple upside-down cake without cherries?
Yes. Simply omit them or replace them with another pitted fruit. The cake will still have its classic caramelized pineapple topping.
6. Can I use a boxed cake mix?
Yes. Prepare the topping as directed, then use a vanilla or yellow cake mix according to its package instructions. Check the baking time because it may differ from this homemade recipe.
7. Why did my pineapple topping stick to the pan?
The brown sugar glaze may have hardened, or the pan may not have been greased adequately. Invert the cake while it is still slightly warm and use a thin knife around the edges.
8. Can I make this cake in advance?
Yes. Bake it earlier in the day or the day before. Cool it completely, cover it, and refrigerate if you need to store it for longer than a short period or your kitchen is warm.
9. Can I freeze pineapple upside-down cake?
Yes. Wrap individual slices securely and freeze them in an airtight container. For best quality, use within 2–3 months.
10. Can I make this recipe gluten-free?
Yes. Substitute a suitable 1:1 gluten-free flour blend designed for baking. The texture may vary depending on the blend.
11. How should I keep pineapple upside-down cake moist?
Measure the ingredients accurately, avoid overbaking, and store the cake covered. The pineapple topping also contributes moisture to the finished dessert.
12. Can I serve pineapple upside-down cake warm?
Yes. It is delicious slightly warm, especially with vanilla ice cream. Allow it to cool enough for the topping to settle before slicing.
Final Thoughts
This old-fashioned pineapple upside-down cake combines juicy pineapple, sweet cherries, buttery cake, and a glossy brown sugar topping in one beautiful homemade dessert. With simple ingredients and straightforward baking steps, it is a wonderful choice for family gatherings, holidays, and everyday sweet treats. Serve each slice on its own or with vanilla ice cream for a classic dessert everyone can enjoy.