Introduction
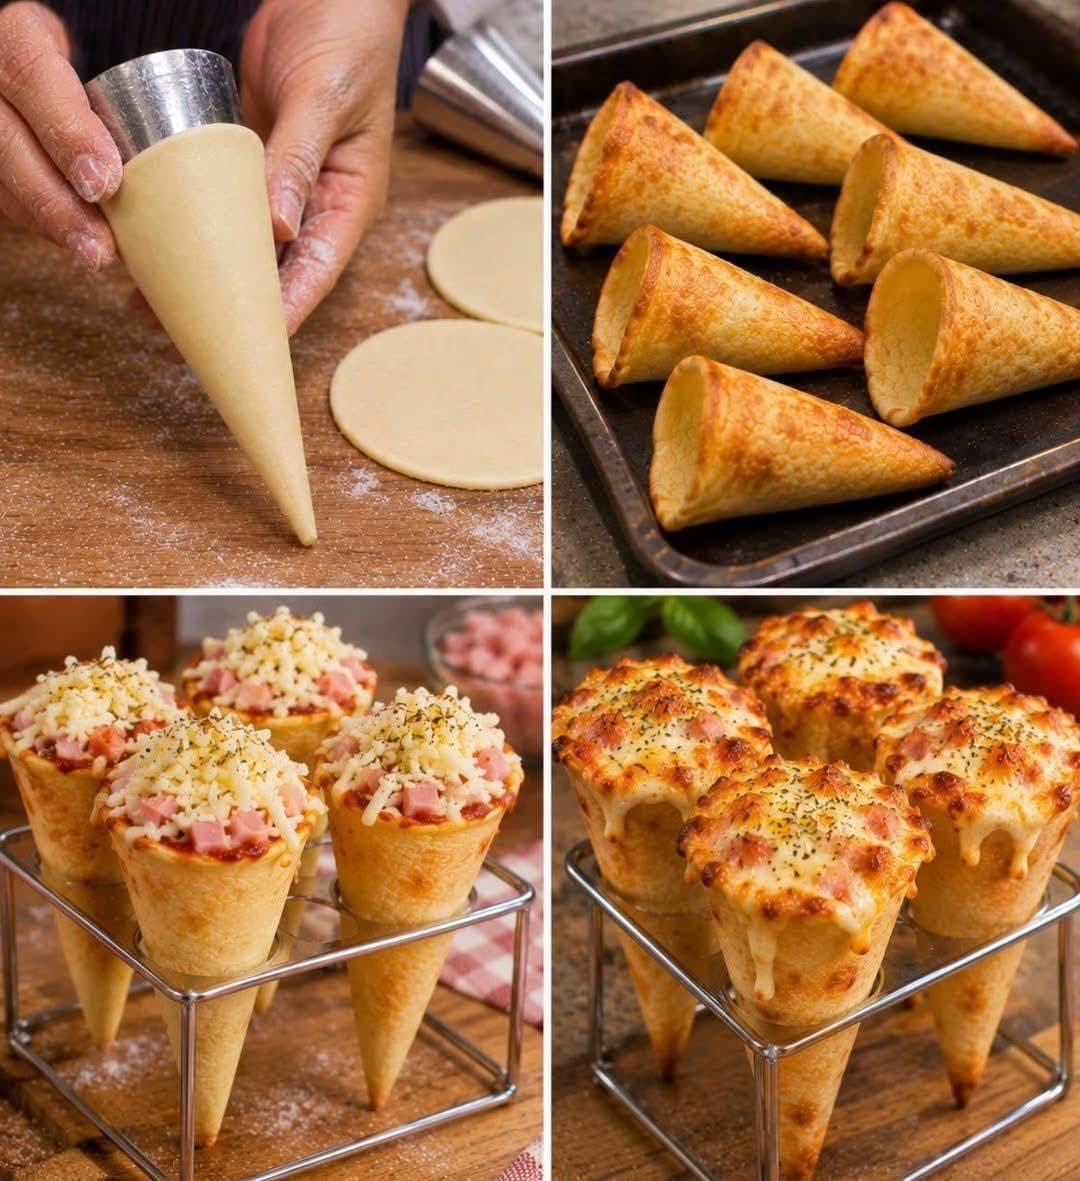
These Homemade Cheesy Pizza Cones are a fun and delicious twist on traditional pizza, featuring golden, crispy dough shaped into convenient cones and filled with classic pizza toppings.
Each cone is packed with flavorful tomato sauce, savory diced ham, melted mozzarella cheese, and Italian herbs. The outside bakes up beautifully golden and crisp, while the inside stays warm, cheesy, and satisfying.
Recipe Overview
| Detail | Information |
| Preparation Time | 25 minutes |
| First Baking Time | 12–15 minutes |
| Final Baking Time | 8–10 minutes |
| Total Time | 45–50 minutes |
| Servings | 8 pizza cones |
| Course | Appetizer, Snack, Main Course |
| Cuisine | Italian-inspired |
| Cooking Method | Baking |
| Difficulty | Medium |
Why You’ll Love This Recipe
Fun pizza presentation: Cone-shaped pizza makes an exciting alternative to traditional slices.
Crispy homemade crust: The dough bakes into a golden shell that holds all the delicious fillings.
Loaded with cheese: Melted mozzarella creates a rich, stretchy center.
Easy to customize: Use your favorite pizza toppings and sauces.
Perfect for parties: Individual portions make serving simple and convenient.
Family-friendly: A fun recipe that both children and adults can enjoy.
Ingredients
For the Pizza Dough
| Ingredient | Quantity |
| All-purpose flour or bread flour | 3 cups (375 g) |
| Warm water | 1 cup (240 ml) |
| Instant yeast | 2¼ tsp (1 packet) |
| Granulated sugar | 1 tsp |
| Olive oil | 2 tbsp |
| Salt | 1 tsp |
For the Pizza Filling
| Ingredient | Quantity |
| Pizza sauce or thick marinara sauce | ¾ cup |
| Diced cooked ham | 1 cup |
| Shredded mozzarella cheese | 2 cups |
| Grated Parmesan cheese | ¼ cup |
| Italian seasoning | 1 tsp |
| Garlic powder | ½ tsp |
| Dried oregano | ½ tsp |
| Fresh basil or parsley | 1 tbsp (optional) |
For Brushing the Cones
| Ingredient | Quantity |
| Olive oil or melted butter | 2 tbsp |
| Large egg | 1 |
| Water | 1 tbsp |
| Extra Italian seasoning | ½ tsp |
Step-by-Step Instructions
Step 1: Prepare the Pizza Dough
In a large mixing bowl, combine the warm water, yeast, and sugar. Let the mixture stand for approximately 5 minutes until slightly foamy if using active dry yeast.
Add the flour, olive oil, and salt. Mix until a rough dough forms.
Transfer the dough to a lightly floured surface and knead for approximately 8–10 minutes, until smooth and elastic. If using a stand mixer, knead with the dough hook for about 5–7 minutes.
Place the dough in a lightly oiled bowl, cover with a clean kitchen towel, and let it rise in a warm place for 45–60 minutes, or until doubled in size.
Step 2: Prepare the Cone Molds
Preheat your oven to 400°F (200°C).
Lightly grease eight metal cream horn molds or oven-safe cone-shaped molds with cooking spray or olive oil.
If you don’t have cone molds, you can make sturdy cone-shaped forms using several layers of heavy-duty aluminum foil. Shape them into cones with a closed pointed end and a wide opening, then place them upright in a suitable oven-safe rack or support.
Make sure any homemade molds are stable and suitable for oven use.
Step 3: Shape the Pizza Cones
Punch down the risen dough to release excess air.
Divide it into 8 equal portions. Roll each portion into a long, thin strip approximately 12–14 inches long.
Starting near the pointed end of a greased cone mold, wrap the dough strip around the mold in a spiral, slightly overlapping each layer.
Press the overlapping edges gently to seal them. Make sure there are no large gaps where the filling could escape.
Repeat with the remaining dough portions.
Step 4: Brush and Bake the Dough Cones
Whisk the egg with 1 tablespoon of water to make an egg wash.
Lightly brush the outside of each dough cone with egg wash. Sprinkle with a little Italian seasoning if desired.
Arrange the molds on a baking sheet with enough space between them.
Bake for approximately 12–15 minutes, or until the dough is puffed and lightly golden.
Remove from the oven and allow the cones to cool for a few minutes before carefully removing the metal molds.
The baked shells should be firm enough to hold their shape.
Step 5: Prepare the Pizza Filling
While the cones are baking, prepare the filling.
In a bowl, combine the diced ham, mozzarella cheese, Parmesan cheese, Italian seasoning, garlic powder, and oregano.
Stir gently until evenly mixed.
Keep the pizza sauce separate so you can layer it inside each cone.
For the best texture, use thick pizza sauce rather than a watery tomato sauce.
Step 6: Fill the Pizza Cones
Place the baked cones upright in an oven-safe cone rack or a sturdy muffin pan that can support their shape.
Spoon approximately 1 tablespoon of pizza sauce into each cone.
Add a layer of the ham and cheese mixture. Continue layering with a little more sauce and filling until the cones are nearly full.
Finish each cone with a generous amount of shredded mozzarella cheese.
Avoid overfilling, as the cheese may bubble over during the second baking.
Step 7: Bake Until the Cheese Melts
Return the filled cones to the oven.
Bake at 375°F (190°C) for approximately 8–10 minutes, or until the cheese is completely melted, bubbly, and lightly golden.
If desired, switch to broil for 1–2 minutes to create a beautifully browned cheese topping. Watch carefully to prevent burning.
Step 8: Garnish and Serve
Remove the pizza cones from the oven and allow them to cool for 3–5 minutes.
Sprinkle with fresh basil or chopped parsley.
Serve warm while the mozzarella is melted and stretchy and the pizza crust is still crispy.
Best Tips
Use the right dough consistency: The dough should be soft and elastic but not sticky.
Roll the dough evenly: Thin, consistent strips create a more uniform cone shape.
Overlap the dough: Slightly overlapping each layer helps prevent gaps.
Seal the pointed end: Make sure the tip is closed so the filling stays inside.
Grease the molds: This makes removing the baked shells much easier.
Bake the shells first: Pre-baking prevents the dough from becoming soggy after adding the sauce.
Choose thick pizza sauce: Watery sauce can soften the crust.
Don’t overfill: Leave a little space at the top for bubbling cheese.
Use a stable rack: Proper support keeps the cones upright during the final baking.
Best Ingredient Options
| Ingredient | Best Options |
| Pizza dough | Homemade dough or refrigerated pizza dough |
| Pizza sauce | Marinara, traditional pizza sauce, or thick tomato sauce |
| Cheese | Mozzarella, provolone, cheddar, or Parmesan |
| Meat | Ham, pepperoni, cooked sausage, or shredded chicken |
| Vegetables | Bell peppers, mushrooms, olives, or onions |
| Herbs | Oregano, basil, parsley, or Italian seasoning |
| Dough topping | Egg wash, olive oil, or melted butter |
Recipe Variations
1. Pepperoni Pizza Cones
Replace the ham with 1 cup of sliced pepperoni. Add mozzarella and a little oregano for a classic pepperoni pizza flavor.
2. Supreme Pizza Cones
Fill the cones with diced ham, pepperoni, cooked sausage, bell peppers, onions, and black olives. Add mozzarella and Parmesan for a loaded pizza experience.
3. BBQ Chicken Pizza Cones
Replace the pizza sauce with barbecue sauce and use 1 cup of cooked shredded chicken. Add mozzarella and a little red onion.
4. Four-Cheese Pizza Cones
Combine mozzarella, cheddar, Parmesan, and provolone for a rich, creamy cheese filling.
5. Vegetarian Pizza Cones
Use sautéed mushrooms, diced bell peppers, black olives, spinach, and mozzarella. Cook the vegetables first to remove excess moisture.
6. Buffalo Chicken Pizza Cones
Mix cooked shredded chicken with buffalo sauce, mozzarella, and a little ranch seasoning for a spicy variation.
7. Hawaiian Pizza Cones
Combine diced ham, small pineapple pieces, mozzarella, and pizza sauce for a sweet and savory filling.
What to Serve With
These homemade pizza cones are delicious on their own, but they also pair well with simple sides and dipping sauces.
- Garlic bread: A classic side for any pizza-inspired meal.
- Fresh garden salad: Adds freshness and balances the cheesy filling.
- Caesar salad: A delicious combination with the crispy pizza crust.
- Marinara sauce: Perfect for dipping the finished cones.
- Garlic butter sauce: Adds extra richness and flavor.
- Ranch dressing: A creamy dipping option.
- Roasted vegetables: Broccoli, zucchini, and bell peppers make excellent sides.
- Potato wedges: A hearty addition for a family-friendly dinner.
Make-Ahead Instructions
You can prepare the pizza dough up to 24 hours in advance.
After kneading, place the dough in a lightly oiled bowl, cover tightly, and refrigerate. Allow it to sit at room temperature for approximately 30–45 minutes before shaping.
You can also bake the empty pizza cones a day ahead. Allow them to cool completely, then store them in an airtight container at room temperature in a cool, dry place.
Prepare the filling separately and refrigerate it until needed. Assemble and bake shortly before serving for the best crispy texture.
Storage
Allow leftover filled pizza cones to cool before storing.
Place them in an airtight container and refrigerate at 40°F (4°C) or below for up to 3 days.
Store the pizza shells separately from the filling whenever possible to help preserve their crispness.
Do not leave cooked ham and cheese fillings at room temperature for more than 2 hours.
Reheating
Oven: Preheat to 350°F (175°C). Place the pizza cones upright on an oven-safe rack and heat for approximately 8–12 minutes, until the filling is hot.
Air Fryer: Reheat at 325°F (165°C) for approximately 4–6 minutes. Check carefully to prevent the cheese from overbrowning.
Microwave: Heat for 30–45 seconds at a time until warmed through. The crust will become softer, so the oven or air fryer is preferable.
Reheat leftovers until the center reaches 165°F (74°C).
Freezing
For the best results, freeze the baked, unfilled pizza shells separately from the filling.
- Bake the dough cones until lightly golden.
- Allow them to cool completely.
- Place them in a freezer-safe container with parchment paper between layers.
- Freeze for up to 2 months for the best quality.
- Thaw at room temperature before filling.
You can also freeze assembled and baked pizza cones, although the crust may soften slightly after thawing.
To reheat frozen filled cones, place them in a 350°F (175°C) oven until hot throughout, checking that the center reaches 165°F (74°C).
Common Mistakes to Avoid
- Rolling the dough too thick: Thick dough can create heavy cones that are difficult to crisp.
- Leaving gaps between dough strips: Open spaces may allow sauce and cheese to leak.
- Skipping the first bake: Filling raw dough cones can result in an undercooked interior.
- Using watery sauce: Excess moisture can make the crust soggy.
- Adding too much filling: Overfilled cones can spill over during baking.
- Removing the molds too early: Allow the shells to cool slightly so they maintain their shape.
- Using unstable supports: Cones can tip over if they aren’t properly supported.
- Overbaking the cheese: Keep an eye on the final baking stage to prevent burning.
Nutrition Estimate
Approximate values per pizza cone, assuming 8 servings.
| Nutrient | Amount |
| Calories | 340 kcal |
| Protein | 16 g |
| Carbohydrates | 38 g |
| Fat | 14 g |
| Saturated Fat | 6 g |
| Fiber | 2 g |
| Sugar | 3 g |
| Sodium | 720 mg |
Nutrition values are estimates and may vary depending on the pizza dough, cheese, ham, and filling quantities.
Frequently Asked Questions
Can I use store-bought pizza dough?
Absolutely! Refrigerated or ready-made pizza dough is a convenient shortcut. Let it sit at room temperature briefly so it’s easier to roll and shape around the cone molds.
What can I use if I don’t have cone molds?
You can make cone-shaped molds using several layers of heavy-duty aluminum foil. Shape each piece into a firm cone and make sure the pointed end is closed. Place the cones in a stable oven-safe rack or support before baking.
Why are my pizza cones falling apart?
This usually happens when the dough strips aren’t overlapping enough or the edges aren’t sealed properly. Press the dough gently as you wrap it around the mold and make sure the pointed end is closed.
Can I make pizza cones in advance?
Yes. Bake the empty shells in advance and store them in an airtight container. Fill and bake them shortly before serving for the best texture.
Can I use different fillings?
Of course! Pepperoni, cooked sausage, shredded chicken, bacon, mushrooms, olives, and bell peppers all work well. Make sure meat is fully cooked before adding it to the cones.
How do I keep the pizza cones crispy?
Bake the empty dough shells until firm and lightly golden before adding the filling. Use thick pizza sauce and avoid adding too much moisture.
Can I make these without ham?
Yes. Replace the ham with pepperoni, cooked chicken, sausage, or vegetables. You can also make simple cheese pizza cones with mozzarella and tomato sauce.
What cheese melts best?
Low-moisture mozzarella is an excellent choice because it melts smoothly without releasing too much liquid. Combining it with Parmesan or cheddar adds extra flavor.
Can I make mini pizza cones?
Yes! Divide the dough into smaller portions and use smaller cone molds. Reduce the baking time and check frequently until the shells are golden and firm.
Final Thoughts
These Homemade Cheesy Pizza Cones are a fun and delicious way to enjoy everyone’s favorite pizza flavors in a crispy, handheld shape. With golden homemade dough, savory ham, rich tomato sauce, and plenty of melted mozzarella, they’re perfect for parties, family dinners, and casual gatherings.
The best part is how easy they are to customize. Try different meats, vegetables, sauces, and cheeses to create your own favorite combinations. Serve them warm with marinara or garlic dipping sauce and enjoy a fun homemade pizza experience in every bite!