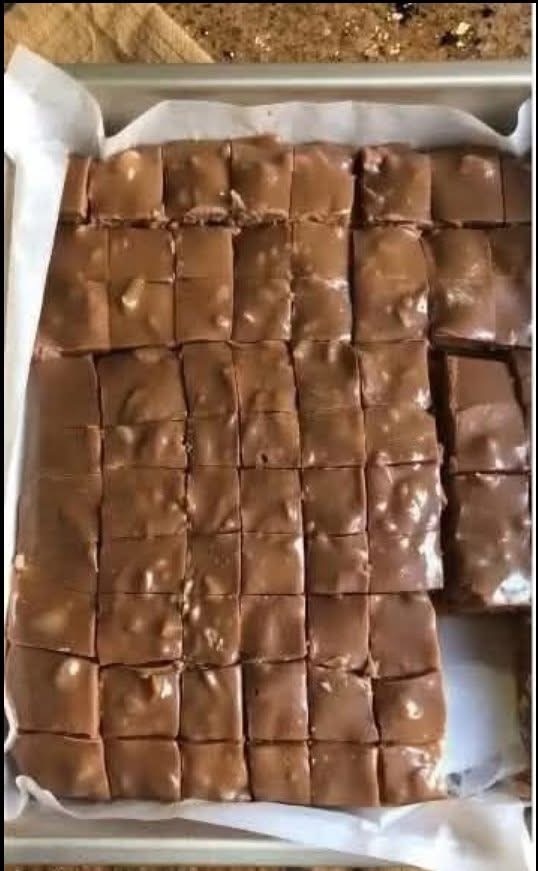
This Easy Old-Fashioned Chocolate Fudge is a rich, creamy, melt-in-your-mouth treat made with simple ingredients and plenty of chocolate flavor. Each square has a smooth, glossy finish and a soft, satisfying texture, making it a wonderful homemade dessert for chocolate lovers.
Whether you’re preparing holiday sweets, putting together a dessert platter, or looking for an easy no-bake chocolate treat to share with family and friends, this homemade fudge is a perfect choice. It requires just a few minutes of preparation, and the refrigerator does most of the work while it sets.
Recipe Overview
| Detail | Information |
| Recipe Name | Easy Old-Fashioned Chocolate Fudge |
| Prep Time | 10 minutes |
| Cook Time | 5 minutes |
| Chilling Time | 2–3 hours |
| Total Time | Approximately 3 hours |
| Servings | 25–36 squares |
| Difficulty | Easy |
| Cooking Method | Stovetop and refrigeration |
| Texture | Smooth, creamy, and firm |
❤️ Why You’ll Love This Recipe
- No baking required: Simply melt, mix, pour, and chill.
- Rich chocolate flavor: Chocolate chips create a deliciously indulgent treat.
- Easy ingredients: Everything is available at most grocery stores.
- Perfect for sharing: Cut the fudge into small squares for parties and gatherings.
- Make-ahead friendly: Prepare it a day before serving.
- Customizable: Add nuts, peanut butter, or other favorite flavors.
🛒 Ingredients
Chocolate Fudge Base
| Ingredient | Quantity |
| Semi-sweet chocolate chips | 3 cups (510g) |
| Sweetened condensed milk | 1 can (14 oz / 397g) |
| Unsalted butter | 2 tablespoons (28g) |
| Pure vanilla extract | 1 teaspoon |
| Salt | ¼ teaspoon |
Optional Add-Ins
| Ingredient | Quantity |
| Chopped walnuts or pecans | ½ cup |
| Mini marshmallows | ½ cup |
| Peanut butter | 2 tablespoons |
| Extra chocolate chips | ¼ cup |
👩🍳 Step-by-Step Instructions
Step 1: Prepare the Baking Pan
Line an 8-inch square baking pan with parchment paper, leaving some overhang on the sides. This will make it easier to lift the fudge out after chilling.
Lightly grease the parchment paper with butter or nonstick cooking spray.
Step 2: Melt the Chocolate
In a medium saucepan, combine the chocolate chips, sweetened condensed milk, and butter.
Place the saucepan over low heat and stir continuously until the chocolate has melted and the mixture becomes smooth, thick, and glossy.
Avoid using high heat because chocolate can scorch easily.
Alternative: Melt the ingredients in a microwave-safe bowl in 20–30-second intervals, stirring thoroughly between each interval.
Step 3: Add the Flavorings
Remove the saucepan from the heat.
Stir in the vanilla extract and salt until completely incorporated.
If you’re adding chopped walnuts, pecans, or other mix-ins, gently fold them into the chocolate mixture now.
Step 4: Transfer to the Pan
Pour the warm chocolate mixture into the prepared baking pan.
Use a silicone spatula to spread it evenly into the corners.
Smooth the surface with the back of a spoon or an offset spatula.
Step 5: Chill Until Firm
Place the pan in the refrigerator for 2–3 hours, or until the fudge is completely firm.
For the cleanest slices, allow it to chill overnight.
Step 6: Cut and Serve
Lift the chilled fudge out of the pan using the parchment paper.
Place it on a cutting board and use a sharp knife to cut it into small squares.
For neat edges, warm the knife under hot water, wipe it dry, and repeat between cuts.
Serve chilled or let the squares sit at room temperature for a few minutes before enjoying.
💡 Best Tips for Perfect Chocolate Fudge
- Use low heat: Melt the chocolate slowly to prevent burning or separating.
- Choose good-quality chocolate: Better chocolate generally produces a richer flavor.
- Stir continuously: Keep the mixture moving while melting for a smooth consistency.
- Prepare the pan properly: Parchment paper makes removing the fudge much easier.
- Allow enough chilling time: Cutting too early can make the squares lose their shape.
- Use a warm knife: This helps create clean, attractive squares.
- Measure carefully: Too much liquid can prevent the fudge from setting properly.
🍫 Best Ingredient Options
Chocolate
Semi-sweet chocolate chips provide a balanced chocolate flavor. Milk chocolate creates a sweeter, creamier fudge, while dark chocolate gives a deeper and less sweet result.
Sweetened Condensed Milk
Use full-fat sweetened condensed milk for the best creamy texture. Do not substitute evaporated milk, as it does not contain the same amount of sugar and will not produce the same consistency.
Butter
Unsalted butter adds richness and helps create a smooth texture. Salted butter can also be used, but reduce or omit the additional salt.
Nuts
Chopped pecans, walnuts, almonds, or hazelnuts add a pleasant crunch and complement the chocolate beautifully.
✨ Delicious Recipe Variations
1. Chocolate Walnut Fudge
Fold ½ cup chopped walnuts into the melted chocolate mixture before transferring it to the pan.
2. Peanut Butter Chocolate Fudge
Swirl ¼ cup slightly warmed peanut butter over the surface before chilling.
3. Double Chocolate Fudge
Combine semi-sweet chocolate chips with dark chocolate chunks for an extra-rich flavor.
4. Rocky Road Fudge
Add ½ cup mini marshmallows and ½ cup chopped almonds or walnuts.
5. Milk Chocolate Fudge
Replace the semi-sweet chocolate chips with milk chocolate chips for a sweeter, softer-tasting dessert.
6. Salted Chocolate Fudge
Sprinkle a small amount of flaky sea salt over the surface before refrigerating.
🍽️ What to Serve With Chocolate Fudge
These homemade chocolate fudge squares are delicious on their own, but they also pair wonderfully with:
- Hot coffee or espresso.
- A glass of cold milk.
- Hot chocolate.
- Vanilla ice cream.
- Fresh strawberries and raspberries.
- A dessert platter with cookies and brownies.
They are especially lovely for Christmas dessert trays, birthday celebrations, potlucks, and homemade edible gifts.
⏰ Make-Ahead Instructions
Chocolate fudge is an excellent make-ahead dessert.
Prepare the mixture, spread it into the lined pan, and refrigerate until completely firm. Once set, keep it covered in the refrigerator until you’re ready to serve.
For the best texture and flavor, prepare it up to 3 days in advance.
🧊 Storage Instructions
Store chocolate fudge squares in an airtight container in the refrigerator.
- Refrigerator: Up to 2 weeks for best quality.
- Room temperature: Up to 3–5 days in a cool environment, provided the fudge is stored in an airtight container and kept away from heat.
- Best storage method: Place parchment paper between layers to prevent the squares from sticking together.
🔥 Reheating Instructions
Chocolate fudge does not need reheating.
If it feels too firm straight from the refrigerator, simply leave it at room temperature for 5–10 minutes before serving.
Avoid microwaving individual squares because they can melt quickly and lose their shape.
❄️ Freezing Instructions
Chocolate fudge freezes well, making it convenient to prepare in advance.
- Cut the completely chilled fudge into individual squares.
- Arrange the squares in a freezer-safe container.
- Separate each layer with parchment paper.
- Seal tightly and freeze for up to 2–3 months.
- Thaw overnight in the refrigerator before serving.
⚠️ Common Mistakes to Avoid
- Using high heat: This can burn the chocolate and create a grainy texture.
- Using evaporated milk: It is not a suitable replacement for sweetened condensed milk in this recipe.
- Adding too much butter: Excess fat can make the fudge too soft.
- Not lining the pan: The fudge may stick and become difficult to remove.
- Cutting before it sets: Give the mixture enough time to become firm.
- Storing uncovered: Exposure to air can dry out the surface and affect the texture.
📊 Nutrition Estimate
Approximate values per square, assuming 36 squares and no optional add-ins.
| Nutrient | Amount |
| Calories | 115 kcal |
| Carbohydrates | 16g |
| Protein | 1g |
| Fat | 6g |
| Saturated Fat | 4g |
| Sugar | 14g |
| Fiber | 1g |
| Sodium | 20mg |
Nutrition values are estimates and vary depending on the chocolate brand, ingredients, and serving size.
❓ Frequently Asked Questions
1. Why didn’t my chocolate fudge set?
The fudge may not have been chilled long enough, or the ingredient proportions may have been incorrect. Make sure you use sweetened condensed milk rather than evaporated milk and allow at least 2–3 hours of refrigeration.
2. Can I make chocolate fudge without a stovetop?
Yes! Combine the chocolate chips, condensed milk, and butter in a microwave-safe bowl. Microwave in short intervals, stirring frequently until completely smooth.
3. Can I use milk chocolate instead of semi-sweet chocolate?
Absolutely. Milk chocolate produces a sweeter flavor. If you prefer less sweetness, use a combination of milk and semi-sweet chocolate.
4. How do I get perfectly even fudge squares?
Chill the fudge completely, lift it out using the parchment paper, and cut it with a large, sharp knife. Wipe the knife clean between cuts.
5. Can I add nuts to the recipe?
Yes! Pecans, walnuts, almonds, and hazelnuts are all excellent choices. Add approximately ½ cup of chopped nuts to the mixture before spreading it into the pan.
6. Can I make this fudge ahead of time?
Yes. It can be prepared several days ahead and stored in an airtight container in the refrigerator.
7. Can I freeze homemade chocolate fudge?
Yes. Cut it into squares, separate the layers with parchment paper, and freeze in an airtight container for up to 2–3 months.
8. What size pan should I use?
An 8-inch square pan creates relatively thick fudge squares. A 9-inch square pan produces slightly thinner pieces.
❤️ Final Thoughts
This Easy Old-Fashioned Chocolate Fudge is a simple yet irresistible homemade dessert with a smooth, creamy texture and rich chocolate flavor. With just a handful of ingredients and no oven required, it’s an excellent recipe for holidays, celebrations, or whenever you’re craving something sweet.
Cut it into neat little squares, arrange them on a serving plate, and enjoy a delicious chocolate treat that everyone will love!