Introduction
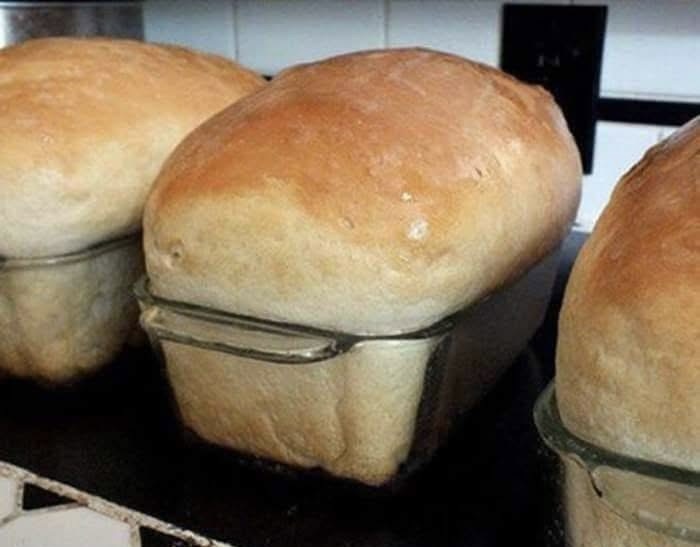
Nothing beats the comforting aroma of freshly baked bread filling your kitchen. This Classic Homemade White Sandwich Bread delivers everything you want in a traditional loaf: a soft, fluffy interior, a beautifully golden crust, and a tender texture that makes every slice perfect for sandwiches, toast, and breakfast. Made with simple pantry ingredients, this reliable homemade bread recipe is easy to prepare and produces two generous loaves for the whole family to enjoy.
Whether you’re preparing school lunches, making grilled cheese sandwiches, or serving warm bread with butter and jam, these homemade loaves are a delicious alternative to store-bought bread. The dough is straightforward to mix and knead, and the two rising periods help create a light, airy crumb. With a few simple baking techniques, you can make bakery-style sandwich bread at home and freeze an extra loaf for convenient meals throughout the week.
📋 Recipe Overview
| Recipe Detail | Information |
| Prep Time | 20 minutes |
| First Rise | 60 minutes |
| Second Rise | 45–60 minutes |
| Bake Time | 30–35 minutes |
| Total Time | Approximately 2 hours 45 minutes to 3 hours |
| Yield | 2 loaves |
| Servings | 20–24 slices, depending on thickness |
| Pan Size | Two 9 × 5-inch loaf pans |
| Oven Temperature | 350°F (175°C) |
| Difficulty | Easy to moderate |
| Texture | Soft, fluffy, and tender |
| Flavor | Mild, slightly sweet, and buttery |
| Best For | Sandwiches, toast, breakfast, and everyday meals |
❤️ Why You’ll Love This Recipe
1. Soft and Fluffy Texture
The combination of yeast, proper kneading, and two rising periods produces a tender crumb that is perfect for sandwiches.
2. Two Generous Loaves
Bake two loaves at once, keeping one for the week and freezing the other for later.
3. Simple Pantry Ingredients
You only need flour, yeast, sugar, salt, water, and oil or butter to create delicious homemade bread.
4. Perfect for Sandwiches
The slices are soft but sturdy enough to hold fillings such as turkey, ham, cheese, chicken salad, or fresh vegetables.
5. Delicious Toast
This bread turns beautifully golden in a toaster and pairs wonderfully with butter, peanut butter, jam, or honey.
6. Customizable Sweetness
Use granulated sugar for a classic loaf or honey for a slightly different flavor.
7. Beginner-Friendly
With clear instructions and easy-to-follow steps, this recipe is an excellent starting point for anyone learning how to bake homemade yeast bread.
🛒 Ingredients
Main Ingredients
| Ingredient | Quantity | Purpose |
| Warm water | 2 cups (475 ml) | Hydrates the flour and activates the yeast |
| Granulated sugar | ½ cup (100 g) | Feeds the yeast and adds mild sweetness |
| Active dry yeast | 1½ tablespoons (approximately 14 g) | Helps the dough rise |
| Salt | 1½ teaspoons (about 9 g) | Enhances flavor and regulates fermentation |
| Vegetable or canola oil | ¼ cup (60 ml) | Helps create a tender crumb |
| Bread flour or all-purpose flour | 5½–6 cups (approximately 660–780 g) | Forms the structure of the bread |
| Melted unsalted butter | 1–2 tablespoons, optional | For brushing the crust after baking |
Important: Flour weights vary depending on the brand and measuring method. Begin with 5½ cups and add the remaining flour gradually until the dough is soft and slightly tacky. You may not need the full 6 cups.
Ingredient Substitutions
| Original Ingredient | Alternative | Expected Result |
| Granulated sugar | Honey, approximately ⅓ cup | Mild honey flavor |
| Vegetable oil | Melted unsalted butter | Richer buttery taste |
| Bread flour | All-purpose flour | Slightly softer structure |
| Active dry yeast | Instant yeast | Convenient preparation |
| Water | Whole milk | Richer flavor and softer crumb |
If using honey, add it with the liquid ingredients. If using instant yeast, follow the package directions; it can generally be mixed directly with the flour.
👩🍳 Step-by-Step Instructions
Step 1: Activate the Yeast
- Pour the warm water into a large mixing bowl or the bowl of a stand mixer.
- Add the granulated sugar and stir until mostly dissolved.
- Sprinkle the active dry yeast over the water.
- Stir gently and allow the mixture to stand for 5–10 minutes.
The surface should become foamy or bubbly, indicating that the yeast is active.
Temperature tip: Aim for water around 105–110°F (40–43°C). Water that is excessively hot can damage the yeast and prevent the dough from rising properly.
Step 2: Mix the Dough
- Add the salt and vegetable oil to the yeast mixture.
- Add approximately 3 cups of flour.
- Stir with a wooden spoon or use the stand mixer on low speed until the ingredients are combined.
- Gradually add more flour, approximately ½ cup at a time.
- Continue mixing until a soft dough forms and begins to pull away from the sides of the bowl.
The dough should be soft and slightly tacky without being excessively sticky.
Avoid adding too much flour. A dry, stiff dough can produce dense bread instead of the light, fluffy texture you want.
Step 3: Knead Until Smooth and Elastic
By hand:
- Transfer the dough to a lightly floured work surface.
- Push the dough away with the heel of your hand.
- Fold it back toward you, rotate it, and repeat.
- Continue kneading for approximately 8–10 minutes.
Using a stand mixer:
- Fit the mixer with a dough hook.
- Knead on low to medium-low speed for approximately 5–7 minutes.
- Stop occasionally to check the dough’s consistency.
The dough is ready when it looks smooth, feels elastic, and stretches without tearing immediately.
If it sticks heavily to your hands, add flour one tablespoon at a time.
Step 4: Allow the First Rise
- Shape the dough into a ball.
- Lightly grease a large bowl with oil.
- Place the dough in the bowl, turning it once to coat the surface.
- Cover with plastic wrap or a clean, damp kitchen towel.
- Leave it in a warm, draft-free place for approximately 60 minutes, or until doubled in size.
Depending on the temperature of your kitchen, the dough may need additional time.
Best tip: Judge the dough by its size and appearance rather than the clock alone.
Step 5: Divide and Shape the Loaves
- Lightly grease two 9 × 5-inch loaf pans.
- Gently press down the risen dough to release excess air.
- Transfer it to a clean work surface.
- Divide it into two equal portions.
Shape each portion as follows:
- Flatten the dough into a rectangle approximately the length of the loaf pan.
- Fold the top edge toward the center and press gently to seal.
- Fold the bottom edge toward the center.
- Roll the dough tightly into a log.
- Pinch the final seam closed.
- Tuck the ends underneath to create a neat loaf.
Place each loaf seam-side down in its prepared pan.
Shaping the dough into a tight log helps it rise evenly and creates a more uniform sandwich loaf.
Step 6: Let the Loaves Rise Again
- Cover the loaf pans loosely with a clean towel or lightly greased plastic wrap.
- Place them in a warm location.
- Allow the dough to rise for approximately 45–60 minutes.
The dough should become noticeably puffy and rise to about 1 inch above the rim of the pans.
If your kitchen is warm, begin checking the dough earlier. Overproofed dough can collapse during baking or develop an uneven texture.
Toward the end of the rising time, preheat the oven to 350°F (175°C).
Step 7: Bake the Bread
- Place the loaf pans on the center rack of the preheated oven.
- Bake for 30–35 minutes.
- Check the color of the crust after approximately 25 minutes.
- Continue baking until the tops are deep golden brown.
The loaves should sound slightly hollow when tapped on the bottom after being removed from the pans.
For the most reliable doneness check, the center of each loaf should reach approximately 190–200°F (88–93°C).
If the tops brown too quickly, loosely cover them with foil during the final part of baking.
Step 8: Brush With Butter
For a soft, shiny crust, brush the tops with 1–2 tablespoons of melted unsalted butter immediately after removing the bread from the oven.
This step is optional. Leaving the bread unbrushed will give you a slightly firmer crust.
Step 9: Cool Before Slicing
- Let the loaves rest in their pans for approximately 10 minutes.
- Carefully remove them from the pans.
- Transfer them to wire cooling racks.
- Allow them to cool for at least 45–60 minutes before slicing.
Cooling helps the crumb finish setting and prevents the bread from becoming gummy when cut.
Step 10: Slice and Serve
Use a serrated bread knife to slice the loaves evenly.
For classic sandwiches, aim for slices approximately ½ inch thick. For toast or French toast, you can cut slightly thicker slices.
Serve with butter, jam, honey, eggs, or your favorite sandwich fillings.
⭐ Best Tips for Perfect Homemade Sandwich Bread
Measure the Flour Correctly
Weighing flour provides the most consistent results. If measuring by cups, spoon the flour into the measuring cup and level it instead of packing it down.
Don’t Use Excessively Hot Water
Water that is too hot can damage the yeast. Aim for 105–110°F (40–43°C) when activating active dry yeast.
Knead Thoroughly
Proper kneading develops gluten, helping the loaf retain its shape and achieve a soft, elastic crumb.
Keep the Dough Soft
Adding too much flour is one of the most common reasons homemade bread becomes dense. The dough should feel soft and slightly tacky.
Allow Both Rises
The first rise develops volume, while the second rise helps the shaped loaves become light and airy.
Shape the Dough Tightly
Rolling the dough into a firm log helps prevent large gaps inside the loaf and encourages even slices.
Avoid Overproofing
If the dough rises too far above the pans, it may collapse during baking. Bake when the loaves are properly puffed.
Check the Internal Temperature
A thermometer helps you avoid underbaked centers, especially when baking two loaves at once.
Cool Completely
Allow the bread to cool before slicing so the crumb stays tender rather than compressed or gummy.
🌾 Best Ingredient Options
| Ingredient | Best Choice | Why |
| Flour | Bread flour | Provides strong gluten development |
| Flour alternative | All-purpose flour | Convenient and produces tender bread |
| Sweetener | Granulated sugar | Classic sandwich bread flavor |
| Natural sweetener | Honey | Adds a mild floral sweetness |
| Fat | Vegetable oil | Keeps the crumb tender |
| Richer fat | Unsalted butter | Adds a buttery flavor |
| Yeast | Active dry yeast | Reliable for traditional bread making |
| Liquid | Water | Produces a classic white loaf |
| Richer liquid | Whole milk | Creates a softer, richer crumb |
🔄 Recipe Variations
1. Buttery Homemade White Bread
Replace the vegetable oil with ¼ cup melted unsalted butter. Brush the baked loaves with additional butter for a rich, soft crust.
2. Honey Sandwich Bread
Replace the granulated sugar with approximately ⅓ cup honey. Mix it into the warm water before adding the yeast.
3. Soft Milk Bread
Replace up to 1 cup of the water with whole milk. The resulting bread will have a slightly richer flavor and tender crumb.
4. Whole-Wheat Sandwich Bread
Replace 1–2 cups of the white flour with whole-wheat flour. Add a little extra water if needed because whole-wheat flour absorbs more moisture.
5. Garlic Herb Bread
Add 1–2 teaspoons of dried Italian seasoning and 1–2 minced garlic cloves to the dough for a savory loaf that pairs well with pasta and soup.
6. Seeded White Bread
Sprinkle sesame seeds, poppy seeds, or sunflower seeds over the tops before baking. Lightly brush the dough with water or milk to help the seeds adhere.
7. Cinnamon Swirl Bread
After flattening each dough portion into a rectangle, sprinkle with a mixture of brown sugar and cinnamon. Roll tightly, seal the seam, and place in the loaf pan.
Make sure the filling stays inside the dough to prevent excessive caramelization around the edges.
8. Homemade Dinner Loaves
Instead of shaping the dough into two large loaves, divide it into smaller rolls. Arrange the rolls on a baking sheet and reduce the baking time, checking for doneness early.
🍽️ What to Serve With Homemade White Sandwich Bread
| Serving Idea | Why It Works |
| Butter and strawberry jam | A simple breakfast favorite |
| Scrambled eggs | Makes a satisfying breakfast |
| Grilled cheese | Creates a crisp, golden sandwich |
| Turkey and cheddar sandwiches | Perfect for packed lunches |
| Chicken salad | A classic sandwich filling |
| Tomato soup | Ideal for dipping |
| Beef stew | Soaks up flavorful gravy |
| Peanut butter and banana | A quick snack or breakfast |
| French toast | Great for weekend brunch |
| Garlic butter | Turns slices into a savory side dish |
⏰ Make-Ahead Instructions
Prepare the Dough the Night Before
- Mix and knead the dough as directed.
- Place it in a lightly oiled bowl.
- Cover tightly and refrigerate to slow fermentation.
- The next day, let the dough warm slightly, then shape it into loaves.
- Allow the second rise to finish before baking.
Refrigerated dough may need additional time to become puffy, so rely on its appearance rather than a fixed rising time.
Bake the Loaves in Advance
Bake the bread completely and let it cool before storing. Keep one loaf at room temperature for immediate use and freeze the second for later.
For the freshest texture, slice the bread only as needed.
🧊 Storage Instructions
Room-Temperature Storage
- Allow the loaves to cool completely.
- Place each loaf in a clean bread bag or airtight container.
- Store in a cool, dry location away from direct sunlight.
- Use within approximately 3–4 days for the best quality.
Keep the bread sealed once cooled to help retain its softness.
Refrigerator Storage
Refrigeration is generally not recommended for plain homemade bread because it can accelerate staling. If you need to keep the bread longer, freezing is usually a better option.
❄️ Freezing Instructions
This recipe makes two loaves, so freezing one is an easy way to keep fresh bread available for later.
Freeze a Whole Loaf
- Let the loaf cool completely.
- Wrap it tightly in plastic wrap or foil.
- Place it in a freezer-safe bag.
- Label it with the date.
- Freeze for up to 3 months for best quality.
Freeze Sliced Bread
- Allow the bread to cool completely.
- Slice the loaf evenly.
- Place parchment paper between slices if desired.
- Transfer the slices to a freezer-safe bag.
- Freeze flat.
You can remove individual slices as needed without thawing the entire loaf.
Thawing Instructions
Thaw a whole loaf at room temperature while wrapped. For a refreshed crust, remove the wrapping and warm the bread in a 350°F (175°C) oven for approximately 8–12 minutes.
Individual frozen slices can be placed directly in the toaster.
🔥 Reheating Instructions
Oven Method
- Preheat the oven to 325–350°F (165–175°C).
- Wrap the loaf loosely in foil if you want to retain moisture.
- Heat for approximately 8–12 minutes.
- Remove the foil during the final few minutes if you prefer a firmer crust.
Toaster Method
Place individual slices in a toaster and toast until golden brown. This method is ideal for breakfast and quick snacks.
Skillet Method
- Heat a skillet over medium-low heat.
- Spread a thin layer of butter on one side of a slice.
- Toast for 1–2 minutes per side until golden.
This method creates a crisp, buttery exterior while keeping the center soft.
⚠️ Common Mistakes to Avoid
| Mistake | How to Avoid It |
| Yeast doesn’t activate | Check freshness and use warm, not hot, water |
| Dough becomes too dry | Add flour gradually and stop when the dough is soft |
| Bread is dense | Knead thoroughly and allow adequate rising time |
| Dough rises too slowly | Move it to a slightly warmer, draft-free location |
| Dough overproofs | Bake when the loaves are properly risen |
| Loaves have large gaps | Roll tightly and seal the dough seams |
| Crust becomes too dark | Loosely cover the loaves with foil if necessary |
| Centers remain underbaked | Check the internal temperature |
| Bread sticks to the pans | Grease the pans thoroughly before adding the dough |
| Bread turns gummy | Allow the loaves to cool before slicing |
| Bread dries out quickly | Store it in a sealed bag once completely cool |
| Frozen bread develops freezer burn | Wrap securely and remove excess air from the freezer bag |
📊 Nutrition Estimate
The following values are approximate estimates per slice, assuming the recipe produces two loaves with approximately 12 slices per loaf. The estimates use vegetable oil and do not include optional butter brushed on top.
| Nutrient | Estimated Amount Per Slice |
| Calories | 170–210 kcal |
| Protein | 4–6 g |
| Total Fat | 3–5 g |
| Saturated Fat | 0.5–1 g |
| Carbohydrates | 30–38 g |
| Fiber | 1–2 g |
| Sugars | 4–6 g |
| Sodium | 200–300 mg |
Actual values vary depending on the flour used, the amount of flour incorporated, slice thickness, and optional ingredients.
❓ Frequently Asked Questions
Why is my homemade sandwich bread dense?
Dense bread can result from too much flour, insufficient kneading, inactive yeast, or inadequate rising time. Keep the dough soft, knead until elastic, and allow it to rise until visibly expanded.
Can I use all-purpose flour instead of bread flour?
Yes. All-purpose flour works well for homemade sandwich bread. Bread flour generally produces a slightly chewier structure, while all-purpose flour creates a softer texture.
Can I use instant yeast?
Yes. Instant yeast can generally be mixed directly into the flour. Follow the package instructions and monitor the dough’s rise.
How do I know when the dough has doubled?
Mark the initial dough level on the bowl with a piece of tape or a washable marker. When the dough reaches approximately twice its original volume, it is ready for shaping.
Why did my loaf collapse after rising?
Overproofing is one possible cause. Weak dough structure or overly loose shaping can also contribute. Allow the dough to rise until puffy, but avoid letting it become excessively expanded and fragile.
How can I make the crust softer?
Brush the tops with melted butter immediately after baking. You can also replace some of the water with milk for a richer, softer crumb.
How do I get evenly shaped loaves?
Divide the dough into equal portions by weight, flatten each portion into a rectangle, roll it tightly into a log, and seal the seam before placing it in the pan.
Can I make this recipe without a stand mixer?
Absolutely. Mix the ingredients in a large bowl and knead by hand for approximately 8–10 minutes.
How long does homemade white bread last?
It generally stays fresh for about 3–4 days at room temperature when stored properly. Freeze extra bread if you want to keep it longer.
Can I freeze homemade sandwich bread?
Yes. Cool the loaves completely, wrap them securely, and freeze for up to 3 months for best quality. Sliced bread can be toasted directly from frozen.
Can I make this bread less sweet?
Yes. You can reduce the sugar to ¼ cup if you prefer a less sweet loaf. Keep in mind that the sugar also contributes to flavor and browning, although the yeast can still ferment without a large amount of added sugar.
Can I use this recipe to make dinner rolls?
Yes. Divide the dough into small portions, shape them into balls, and place them in a greased baking dish. Allow them to rise until puffy and begin checking for doneness after approximately 18–25 minutes at 350°F (175°C).
🥖 Final Thoughts
This Classic Homemade White Sandwich Bread is a reliable recipe for anyone who wants soft, fluffy bread made from simple ingredients. The golden crust, tender crumb, and mild flavor make it perfect for sandwiches, breakfast toast, grilled cheese, and countless everyday meals.
The key to excellent homemade bread is balancing the flour, kneading until the dough becomes elastic, allowing enough time for both rises, and baking until the centers are fully cooked. Make both loaves for your family or freeze one for busy days. Once you experience the flavor and texture of freshly baked sandwich bread, you may find yourself making this recipe again and again.