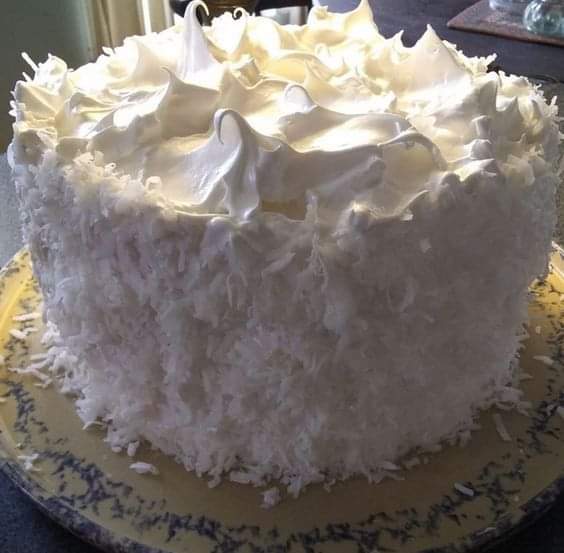
Grandmama’s Homemade Coconut Cake is a from scratch cake with decadent (and no fail) 7 minute icing. This is a favorite of our family for holidays and special occasions year round. I found it in an old box of papers that belonged to my grandmother. She had typed it out on letterhead from the company where she worked and later came back, circled it, and wrote in “Real good”. After trying it for myself, I had to agree! When it comes to moist cakes, this is the mother of them all. If a crumb drops from your fork, don’t be surprised if you find your finger chasing it around your plate – it’s just that good.
Top it off with no fail seven minute frosting and a sprinkling of coconut and prepare yourself for a coconut cake experience unlike any other! One of the great things about Grandmama’s seven minute frosting is that you don’t need a double boiler to make it and you can forget fretting over whether or not the weather is dry enough – this comes out perfect every time regardless. If you’re making a layer cake and you like generous amounts of frosting, I suggest doubling the frosting recipe.
Ingredients
vegetable shortening and flour for preparing the pans
1 cup unsalted butter two sticks, at room temp
2 cups granulated sugar
5 large eggs
1 teaspoon vanilla extract
1 teaspoon coconut flavoring found near vanilla extract
2.5 cups all purpose flour
1 teaspoon baking soda
1 teaspoon baking powder
1/4 teaspoon salt
1 cup buttermilk
No fail seven minute frosting click here for printable recipe
2 cups shredded sweetened coconut for garnishing cake
Instructions
Preheat oven to 350. Lightly grease and flour two 9 inch round cake pans or one 9×13 cake pan and set aside.
Cream together the butter and sugar in a large bowl with an electric mixer at medium speed until very smooth, at least four minutes.
Add eggs, vanilla, and coconut flavoring and beat well to combine. In a separate medium sized bowl, stir together flour, baking soda, baking powder, and salt.
Add flour mixture and the buttermilk to the butter mixture and beat with an electric mixer at medium speed, scraping down the sides as needed, until thoroughly blended and smooth, 2-3 minutes.
Pour batter into the prepared pans. Bake until a toothpick inserted in the center comes out clean, 25-30 minutes for round cakes and 30-35 for a 9×13 cake.
Cool completely and frost with no fail seven minute frosting. Sprinkle with coconut and press coconut into sides immediately after frosting.
Keep covered at room temp for up to two days or in the refrigerator for up to a week.
Of course. Here are the variations, tips, storage instructions, and conclusion for Grandmama’s Coconut Cake, presented as requested.
Variations
While Grandmama’s original recipe is a masterpiece, there are wonderful ways to customize it to your taste.
For a richer, more decadent cake, consider toasting the coconut used for garnishing. Spread the shredded coconut on a baking sheet and bake at 350°F for 5-10 minutes, stirring occasionally, until it becomes fragrant and develops golden-brown tips.
This adds a delightful nutty flavor and a satisfying crunch that contrasts beautifully with the soft cake and fluffy frosting.
For those who enjoy a textural surprise or a burst of fruitiness within the cake, consider adding a cup of mix-ins to the batter.
Drained, well-crushed pineapple can introduce a tropical tang that pairs wonderfully with the coconut, while a handful of sweetened flaked coconut folded into the batter will amplify the coconut flavor in every single bite.
Be sure to coat any add-ins lightly in flour to prevent them from sinking to the bottom of the pan during baking.
If you are a fan of filled layer cakes, a simple yet stunning variation is to add a layer of lemon curd or seedless raspberry jam between the cake layers.
The bright, tart flavor of the fruit filling cuts through the sweetness of the cake and frosting, creating a more complex and sophisticated dessert.
Simply frost the bottom layer as normal, pipe a dam of frosting around the edge to contain the filling, spoon your chosen curd or jam inside the dam, and then carefully place the top layer over it.
Tips
The single most important tip for this cake is to ensure all your refrigerated ingredients are truly at room temperature before you begin. This means taking out the butter, eggs, and buttermilk at least an hour ahead of time.
Room-temperature ingredients emulsify much more easily, creating a batter that is smoother, more voluminous, and bakes up with an exceptionally even and tender crumb. Cold ingredients can lead to a dense, heavy cake.
When preparing your pans, be thorough to guarantee easy release after baking. After greasing the pans with vegetable shortening, add a tablespoon of flour and tilt the pan to coat the bottom and all sides evenly. Tap out any excess flour.
For absolute insurance against sticking, you can also line the bottom of the greased pan with a circle of parchment paper before flouring it. This extra step ensures your beautiful cake will slide out perfectly intact.
When making the seven-minute frosting, the key to its legendary “no-fail” status is following the instructions precisely.
Use a stand mixer or a hand mixer for the full seven minutes; attempting to do this by hand is not feasible.
The frosting is ready when it forms stiff, glossy peaks that hold their shape. Frost the cake immediately after the frosting is made, as it will begin to set quickly. Work efficiently to spread it and apply the coconut before the frosting crusts over.
How to Store
Due to the delicate nature of the seven-minute frosting, which is essentially a meringue, proper storage is crucial. The frosted cake should be kept at cool room temperature, covered with a cake keeper or a large inverted bowl, for up to two days.
Do not store it in an airtight container at room temperature, as this can cause the frosting to become sticky and weep. The cake is best enjoyed within the first 48 hours for optimal texture and flavor.
For longer storage, refrigeration is necessary. Because the refrigerator is a dry environment, you must take steps to prevent the cake from drying out.
Place the cake in a cake carrier or carefully wrap it in plastic wrap, using toothpicks poked into the cake to tent the wrap and prevent it from touching and marring the frosting. Refrigerated, the cake will keep beautifully for up to a week.
Allow a refrigerated cake to sit at room temperature for about an hour before serving to allow the butter in the cake to soften and the frosting to lose its chill.
This cake does not freeze well once frosted due to the meringue frosting, which does not thaw favorably. However, you can successfully freeze the unfrosted cake layers for up to three months.
Wrap the completely cooled layers individually in two layers of plastic wrap and then a layer of aluminum foil. Thaw the wrapped layers overnight in the refrigerator before bringing them to room temperature, frosting, and garnishing.
Conclusion
Grandmama’s Homemade Coconut Cake is more than just a recipe; it is a cherished heirloom that carries the warmth of family tradition and the unmistakable mark of a dessert that has been thoroughly tested and loved.
Its incredibly moist crumb, rich coconut flavor, and ethereal frosting come together to create a truly unforgettable experience that stands far above any store-bought or box-mix version.
This cake promises to create new memories while honoring old ones. Whether you follow the recipe to the letter for a taste of pure nostalgia or experiment with one of the delightful variations, you are sure to create a spectacular centerpiece for your table that will have everyone, just like Grandmama, circling the recipe and writing “Real good.”